![]()

Cue the applause – you’re beginning your blogging journey! I’m so glad you are because blogging is amazing! It’s connected me with some of my favorite people, it’s allowed me the freedom to work while being home with my two girls, and it’s given me a career that I can take anywhere! You can read about my personal blogging journey here but today, it’s about you and your journey. Let’s do it.
I’m going to walk you through how to start a blog on a self hosted Wordpress site hosted on Bluehost. I highly recommend self-hosting your blog. Being “self hosted” means you get for a monthly fee a hosting company will host your website on their servers. Being self hosted gives you much more freedom over your blog. Free services like blogspot and wordpress.com limit your options and functionality. When you are self hosted you are able to customize your website to your liking. If you are serious about blogging, creating a self hosted website that gives you creative freedom is so important!
To get hosted, I recommend hopping on Bluehost.com. It’s the perfect place to start for new bloggers. They make the whole process so easy to set up, it’s inexpensive, and they offer 24/7 technical support if you run into any problems (this is like gold when it comes to those first weeks of blogging – trust me!)
First things first – you gotta have a name. If you already have something in mind head over to hover.com and you can check it’s availability. Choosing a domain name is arguably one of the most important parts about starting a blog. Think about it long and hard – you want it to specific yet flexible because chances are as you move along in your blogging journey your focus may shift and you want your blog name to be able to encompass all that you want your business to be.
Navigate to Bluehost.com and click “Get Started Now.”

1. Select a plan. The “Basic” plan is great for the beginner blogger. I used a very inexpensive host for nearly two years before I had to switch. The $3.95/mo is a veryYou can always upgrade in the future once your blog grows and you need more space.

2. Register your domain name. Enter the domain name you’ve chosen under the “new domain” box on the left and then click next.

3. Enter the personal account information requested.

4. Select the Basic Plan for 36 months – that will give you the $3.95/month price. You also have the option to select 24 months for $4.95/month, 12 months for $5.95/month – all of those options do require you to pay the full hosting cost upfront. Two reasons why I’m okay with paying Bluehost that money upfront:
- They have a money back guarantee, so if you are unhappy with the service or end up switching hosts within 30 days your money will be returned to you.
- It’s the best value. You can go with another host that allows you to pay a month at a time but the monthly rate is much higher.

Don’t worry about selecting any of those extras for now – you can come back and add these items later if you feel the need.
Note: If pre-paying doesn’t sound like something you are interested in, there are many other hosting options to choose from. This is a great resource for finding a blog host.
5. Enter your billing information. Don’t forget to check the box to agree to the terms and conditions, then click next.
You’ll be taken to a page that offers you some options to add on. Go ahead and skip this step for now, you can add these items later.

6. You’ve officially created a Bluehost account! And you are now ready to rock the blog world… well almost. Now it’s time to create a password.

7. Create your Bluehost password. On this page you’ll create your Bluehost password – this will be the password you use to login to your Bluehost Cpanel (control panel). Be sure to create a secure password.

8. Log in. You can now log in to your new Bluehost Cpanel and get started!

9. When you log in for the first time you’ll see a welcome message that offers to guide to you through the next steps. Go ahead and skip that and we’ll be ready to install Wordpress onto your site.

10. Welcome to your cPanel as Bluehost calls it. Take a minute to look around. In that first section called, “website” navigate to the button that says “Install Wordpress”

11. On this page it will ask if you if you want to install WP yourself or if you want Bluehost to do it for you. You want to do it yourself. I promise it’s painless. Click “Install.”

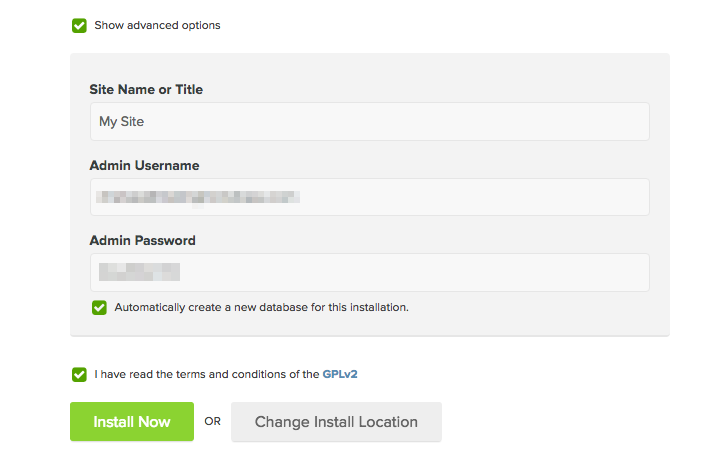
12. Set up your WordPress login information. Check the show advanced options box and here. The box will enlarge and you will set up your Wordpress login information. This is the login information you will use to log into your site. Be sure that “Automatically create a new database for this installation” and “I have read the terms and conditions of the GPLv2” are checked. Click “Install Now.”
 13. At the top of your browser you’ll see a green bar showing that your install is underway.

The bar will turn orange with a note letting you know that your install is successfully complete. At this point you should receive an email from the MOJO Marketplace with all of your WordPress access information. Be sure to save it!
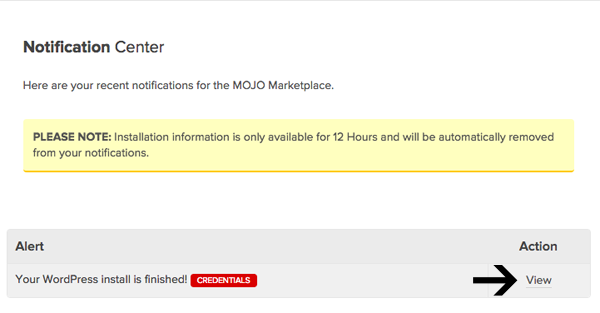
14. Click “view credentials”

15. In your notification center, click “view” to view your WordPress admin login url. Important! This admin information is only available for 12 hours so be sure to save all of this information somewhere safe.
16. Click on your WordPress admin login url.
17. Log in to WordPress. Now you are on your site’s log in page, hooray! Whenever you log into your blog this is the url you will use. Here you’ll enter your log in credentials that were viewed in the notification center.

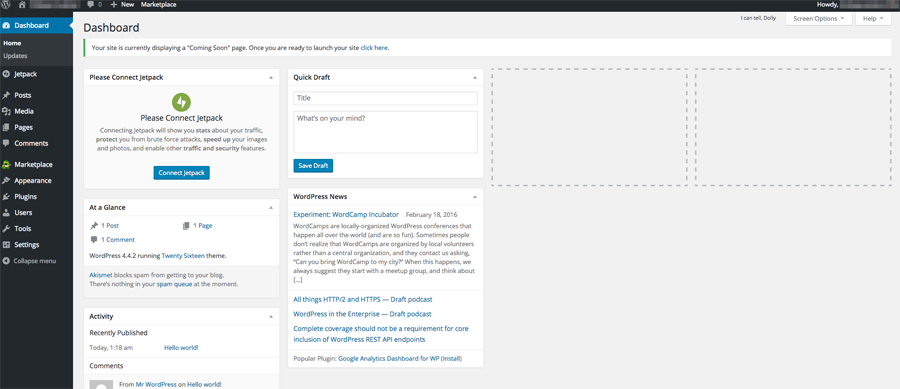
18. You’re in! This is your site’s dashboard. You’ll get to know it very well. It’s the command center of your blog. Take your time to learn to navigate it. Not only is there where you’ll go to write your blog content, this is also where you’ll go when you are ready to customize your blog!