How to Install Peel and Stick Backsplash to a Rental Kitchen
Whenever we move to a new house, especially on base, I always hold my breath before the initial walk-thru. What will the kitchen look like? So much of a rental can be masked over – walls you can paint, the floors can be covered with beautiful rugs, but the kitchen, it’s tougher. Our current kitchen is one of my least favorites we’ve had. It dates the house more than any other space. The laminate cabinets with wood trim are not my favorite look. While there were a lot of things in this kitchen that I couldn’t change like the cabinets and mismatched appliances – I can do some things to help. I decided early on that I would do some sort of peel and stick backsplash or a stencil. I eventually landed on a peel and stick backsplash option I love.

For your convenience, this post may contain affiliate links. That means, at no additional cost to you, I may make a small commission on your purchase. Click here to read my full disclosure policy
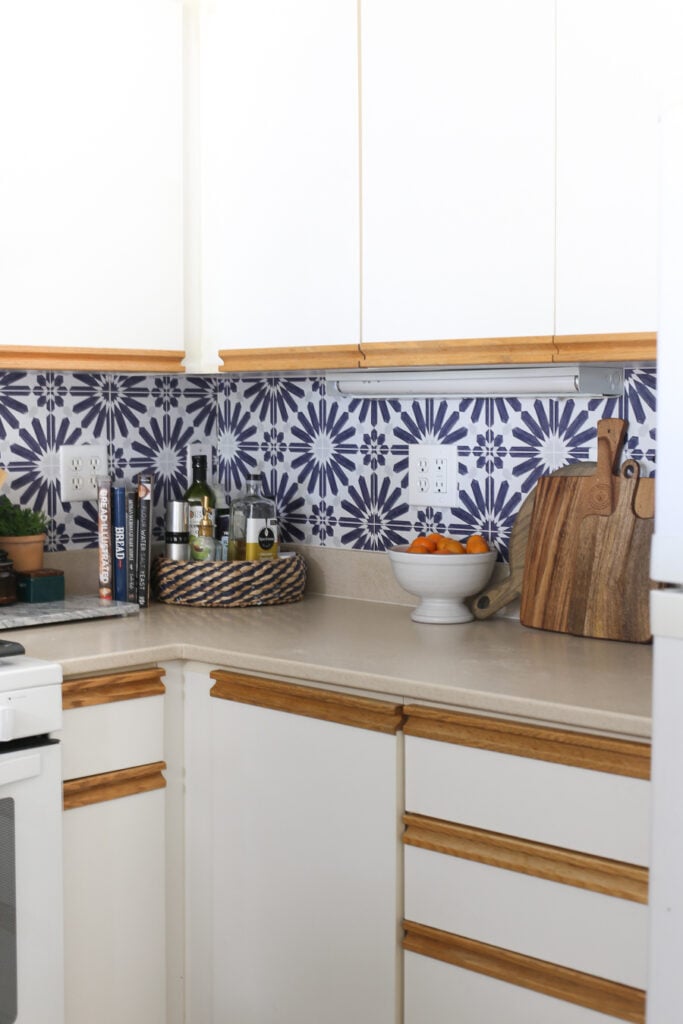
Adding a peel and stick backsplash in this kitchen draws the eye away from the ugly cabinets and towards a vibrant pattern that adorns the walls. It’s a great alternative if you don’t have a tile backsplash already or if you have one that isn’t your taste.
Here are some reasons why I like a peel and stick backsplash
It’s great for rental spaces.
The installation might be a time-intensive but it’s worth it for 2-3 years in a rental home. Also, the demo is really simple – it just peels right off.
Peel and stick backsplash makes a big impact.
I’ve seen peel and stick backsplash in kitchen or bathroom, laundry rooms, around fireplaces, step risers, or below a bar. There are just so many uses and it’s really high reward for small effort.
It’s affordable
I think affordability is relative but in comparison to actual tile, the installation of peel and stick backsplash is very inexpensive.
It’s easy to clean
These peel and stick vinyl sticker backsplashes are really easy to wipe clean. I don’t know for certain that they are water-resistant but they do wipe down really easily.
Easy to install
I’ve installed lots of temporary wallpaper and this was the easiest to install. Probably because it was in the smallest space but it went up in just two hours and I worked all alone.
There are dozens of options for a faux tile backsplash including smart tiles, which are great because they have a look and feel of tile but are still peel and stick. They have subway tile-looking smart tiles as well as mosaic tile. The only issue with these adhesive tiles is that they aren’t easily removed.
If you are looking for some pretty patterned peel and stick backsplash, I shared some options for temporary backsplashes here. I opted for this blue faux cement tile looking peel and stick backsplash. The installation was rather straight forward but I do have some tips to share.
I did a similar wall treatment in my rental laundry room. I had a lot of experience with peel and stick wallpaper which is essentially what this is.

Some Tips for Installing a Peel and Stick Backsplash
Save money by picking a pattern that repeats both up and down and left to right. While I love the pattern I chose, I ended up with a lot of waste. If I would have picked a pattern that had a smaller repeat or repeated the same both up and down and side to side, I could have used up some of the waste I had. Unfortunately every time I would cut off the excess, it wasn’t able to be used anywhere else because the patterns did not match up. That being said, I used three rolls of this backsplash which ended up being approximately $225. That’s a small price to pay for the impact on this space. If you have a smaller space to cover, I think it’s worth the investment to splurge for the peel and stick backsplash you love even if you may end up with some waste.
Measure, measure, measure. I kind of winged it when it came to measurements. I ended up only have enough to do two walls because initially, I hadn’t ordered enough rolls. I had to order another roll leaving my job 2/3 complete for several weeks. The shop that I ordered my peel and stick from is very helpful so if you are unsure how many rolls you’ll need, you can always ask for guidance.
Get yourself a Xacto knife. I learned this trick when I did the removable wallpaper in my office at the Florida house. Box cutters will work in a pinch but a nice sharp Xacto knife is the key to cutting nice crisp lines for the edges of your backsplash.
Installation
Supplies needed:
Rolls of backsplash (I needed 3 – this is the one I bought)
Utility Knife (I used an Xacto)
Credit card or some type of straight edge to get out any air bubbles
Sharp Scissors
Tape measure
The installation of this peel and stick backsplash was pretty straightforward. This is essentially the same as backsplash tile stickers except this comes on a roll, like wallpaper. The first thing to do is to remove everything from the countertops, wipe down all of the walls really well so that the sticker backing can adhere properly.

Start by gently folding back the sticker backing about 2 inches and line up the sticker at the top of your backsplash area. I started on the edge of the wall, working your way over – here I’m starting on the edge of my stove. Press firmly to adhere the sticker to the wall. Swipe your hand across the sticker to make sure it’s secure, then gently and slowly start pulling the backing away, pressing down the sticker to the wall as you go.

As you reach the end of your peel and stick backsplash area press down firmly where the wall meets the countertop, I run my finger along the ledge to make sure it’s secure. That’s where you’ll use your Xacto knife to trim off the excess backsplash sticker. I find that cutting right along the caulk line to be most effective. You’ll continue to do this along your backsplash area making sure to line up the pattern as you.

Here’s a little tip for when you get to the outlets. I place the sticker right over top of the sticker, then gently cut an X shape in the sticker right where the outlet is. Doing this gives you a little flexibility in that spot and you can gently use your Xacto knife to cut around the outlet. Another option is to take the outlet cover off so that your sticker doesn’t have to be cut perfectly around the outlet cover.


It’s hard to overstate how much of a difference this peel and stick kitchen backsplash makes in our home. It’s just that good. Not only does it bring your attention to that pretty tile rather than the ugly cabinets, it truly makes the small space feel much larger.
This peel and stick tile are obviously great for kitchen backsplashes but you can use them in so many other ways: bathroom walls, around a fireplace, on a kitchen wall, etc.
Here are some beautiful backsplash options that I found on my search for the perfect one for my space.
If you’re a renter – what are some things you’ve done that have really brought your temporary place to the next level? Let me know in the comments!


I found your blog site through Abby Lawson’s email from her site.
I see your watch on the right wrist! Are you a lefty?!
Lefty here, military kid to boot. You being military family means you really know weird and odd homes and the space issues they provide and the rules and regs of things you can and cannot do to modify and improve while you’re renting/housed somewhere.
I look forward to reading the rest of your blog and hope you have some e-courses and stuff like Abby. She has some of my first buy home goal ideas in her e-course series. (we rent still)
Hi Jennifer! So happy you found me. Abby is a dear friend of mine. And yes, I’m a lefty too!! So is my daughter 🙂
I have the same cabinets in my laundry room, and used a ship lap contact paper over them. Totally changes the vibe!
This looks fantastic!
Hi Chelsea,
Wow, what a difference! The pattern you chose is beautiful. Would this work over existing tile? I would like to cover our kitchen backsplash as redoing our tile isn’t in the budget right now, but I don’t know if the peel and stick would lay flat over it. Any thoughts?
Thanks for the great post!
I know you’ve since moved, but we’re getting ready to move onto Upshur in two weeks. I noticed there isn’t a microwave in the kitchen but there’s that second counter in the laundry room in our expected layout… I have to ask, with your home looking so amazing and put together (straight out of a BHG 😉) where did you keep your microwave without compromising counter space in the kitchen and risk making the house look like it doesn’t make sense (my current problem). I’ve been following your IG since I found it linked on a wives page and I’m so blown away and inspired!
We put the microwave on the counter closest to the fridge. You could put it in the laundry room. I know someone else who used a little butcher block cart next to the pantry and put it on there. So there’s options!!! Good luck in 29! I miss it SO much!
thank you! obviously we’ll have to see what we’re dealing with once all our stuff is in there, but I had to ask. I love your style and seeing someone take these military homes to the next level is exciting!