IKEA HACK – DIY Upholstered Headboard from the IKEA TARVA bed
This post includes affiliate links
Get ready to pin ya’ll! You guys are going to want to save this tutorial for later! I’m spilling all the details on the DIY upholstered headboard today!

Remember a month or so ago, when I shared my inspiration for Peighton’s room? I had this beautiful bed picked out but it was WAY out of my price range. I had also put together a collection of awesome IKEA bed hacks that totally inspired me! So I decided to do IKEA bed hack of my own and do a DIY upholstered headboard in pink!
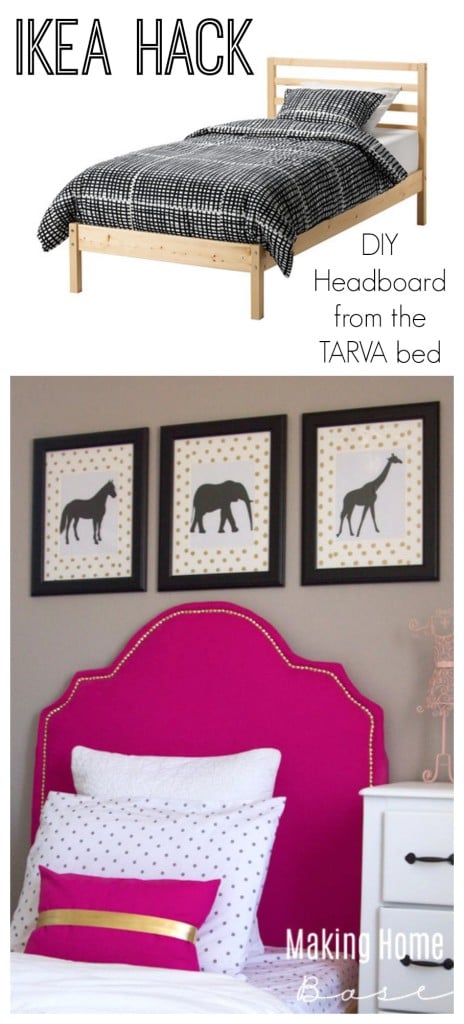 And since we already had the IKEA TARVA bed in Peighton’s room – I wanted to just go ahead and use it but zhush it up with a pretty headboard. The IKEA TARVA bed is relatively cheap, just $70. They have an even cheaper wood bed (around $30) available but my store was completely out of stock, so TARVA it was.
Products We Used:
Jig Saw
Electric Staple Gun ( I like this upholstery staple gun)
Wood Glue
Hammer and Nails
Rubber Mallet
Large Piece of Ply Wood or MDF (size will vary. Measure the wide of current headboard for proper width +desired height)
1 Twin Sized Egg crate Foam Padding
2 yards of Fabric (Canvas – I used this Fuchsia Fabric)
2 yards of quilt batting
Fabric Glue
First thing is first – Iron your fabric – it will be a total pain but it’s going to be worth it to get nice smooth lines.
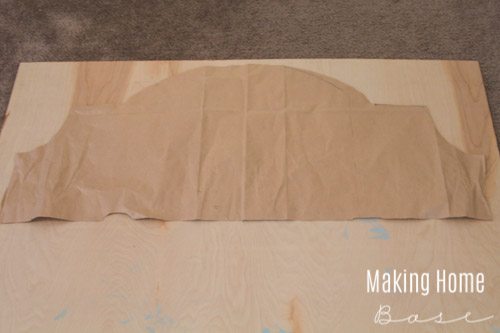
First you’ll need to decide the shape of your headboard. I googled “Upholstered Headboard” and scrolled through thousands of images before deciding on my shape. I wanted something I could easily free hand. For the design, I grabbed a brown paper bag, carefully pulled it apart into one long piece, and then folded it in half. Then I traced half of my design starting at the fold. Once it was perfect I cut it out, unfolded it, and laid it on my piece of wood to trace.

Once I was happy with the traced design, Matt got out the jigsaw and cut the wood along my traced lines created the headboard shape.
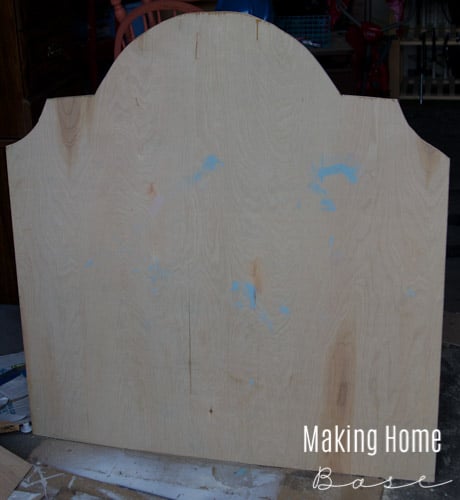
Not bad!

Note: If you are buying an IKEA bed specifically for this purpose don’t put it completely together! We had the bed for some months before taking on this task so we had to remove the headboard to attach the piece of wood.
Next, using wood glue attach the piece of wood to the front of the TARVA headboard. Use clamps to hold the two pieces together.

Once the wood glue is dry, you can secure it with finishing nails.

Next is the padding. Cut the padding to the shape of your headboard. And use fabric glue to attach the egg crate padding to the front of the headboard.

After the padding is on, you can add the layer of batting. Using your electric staple gun, pull the batting taut and staple to the back side of the headboard.

The front of your headboard will look like this. It’s ready for the fabric.
Using the same technique, making sure the fabric is nice and taut staple the fabric to the back side of the headboard. I found that start on one side and moving up the side of the headboard was the best way to get the least amount bunching. Going around the curves, make a few snips in the fabric on the back of the headboard to allow you to pull the fabric as tight as possible.
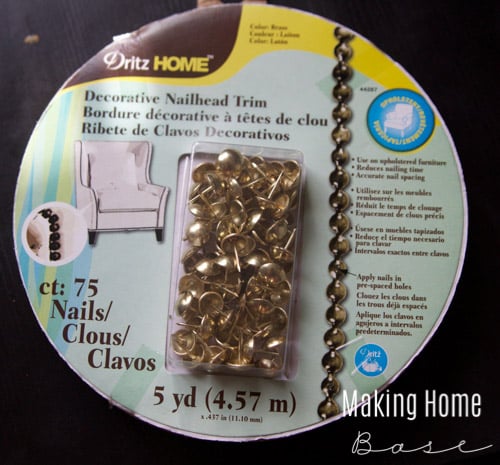
A note about nailhead trim. This was my very first project using nailhead trim (way to be adventurous right?). You’ll want to use a ruler/yardstick to keep it straight – I didn’t and wish I had. Also the trim bends and turns so you don’t have to cut each piece as you move along.

Every few “nailheads” there is one with a hole where the actual nailhead hammers in. Use a rubber mallet when hammering in these guys and be gentle, the heads can pop right off if you hammer too hard.

After the nailhead trim was complete we simply placed the headboard back on the bed.

This DIY upholstered headboard ended up being a great day project for us and ended up saving us a small fortune! Now we get the luxurious and sophisticated look of a fabulous upholstered headboard at just a fraction of the cost! That’s winning if you ask me!!
Thank you so much for visiting today!! Have a great weekend! xo
If you like this project, check out the full room reveal here.




It turned out so wonderfully. Now could you come to my house and do this for my queen sized bed in the guest room, oy! Pinning!
I just have to say that I am so ridiculously in love with this headboard. You should fully expect to see me doing a copycat version when my kid gets into a big girl bed…..or I may do one for myself! haha!
I love this so much! I am featuring you tomorrow… Thank you for linking up with The Party Bunch!!!
xo
Desiree
Hi! I love this project! I love the vibrant pink that you used. Who would ever guess that it all started with a plain wood headboard? Thanks for sharing!
Love how this turned out! What an awesome hack! I never would have guessed that was a Tarva! Thanks for the inspiration, friend– pinned! Hope you’re having a great weekend!
~Abby =)
Stunning! I love the color of pink you used…my daughter just bought a chair that color. I just found your blog and so happy I did…I’m your newest follower. Your home is lovely and you have a LOT of talent! 🙂
Stop by and say hi when you can. I’ve been having a lot of technical problems so haven’t been visiting or blogging much the past couple months. Hopefully, this week will be different!
xo
Pat
I love Ikea and this is an amazing transformation. Woud love if you shared this on Merry Monday Linky part tonight at 6pm PST.
Looks fantastic! I would love it if you joined and contribute your awesome posts at my link party at City of Creative Dreams, starts on Fridays 😀 Hope to see you there at City of Creative Dreams Link Party.
Chelsea! This is seriously genius my friend. The “big girl” room is so amazing and the pink fabric and detail you did on this bed…well, shoot…I can hardly stand it! Love, love, LOVE!
Having lived through past examples of the treacherous manipulations the right side of politics is capable of, with the willing participation of their Media compatriots,will this election campaign denigrate into yet another example of the will of the Australian (not Murdoch} Public being subverted by rumor and innuendo sometimes deliberate lies.One lives in hope we have progressed to the point that we can see for ourselves.
it looks good! My DIY upholstered bed was my first time using the nailhead trim too and I didn’t like it. I think I’ll go with the individual from now on!
This is beautiful! I had wanted to something like this in our girls room too, but our Ikea was out of the twin size Tarva. Yours turned out amazing, good job!
This is so awesome! Saw it linked up at House of Hoff, Enchanting Inspiration Link Party! I’m pinning this and sharing of FB! ~Sonya
I’m so jealous of your daughters room! The polkadots, the animals, the gold pops, the hot pink! I love it! Pinned as inspiration for my queen-sized headboard with my new jigsaw 😀
LOVE this! Great tutorial and the bedroom is super cute! Hopped over from Enchanted Inpiration Link up.
Wow, this is pretty amazeballs, Chelsea! Looks super high-end! Thanks for linking up to They DIY’ers—hope to see you back again next week : ]
Love the outcome! I would have never thought to use the existing bed. I’ve been wanting to try nailhead as well so thanks for the tip on the ruler!
Love how this headboard turned out! Also the color you chose!Very nice!Pinning!
You are the sweetest, Aniko! I can’t wait to see you at Haven!!
Hello,
This looks so good. Trying to talk my hubby into an upholstered bed for our son but I can’t disagree that they are totally overpriced. I love your hack and was wondering how you worked on the frame. Did I miss it somewhere?
Thank you!
Hey Amanda! We actually didn’t do the frame – our daughter’s bedding covered it so I didn’t feel like it was worth the trouble. There is another blogger that did an IKEA hack that does show you how to do the frame. Search here on my blog for customized IKEA beds and you’ll find it!
Hello! Beautiful work!
I have a question- we have a memory foam
Mattress that is pretty thick. Does creating a padded headboard in any way affect the ability to fit a mattress inside the bed frame? Should the padding and egg crates cover the entire headboard or only part of it if this is a concern? Don’t have the bed yet. You did a great job! Thanks for sharing