• Home
  • Start Here
  • About
  • My Home
    • My Home Tour
    • Paint Colors
  • DIY/Decor
    • Decorating
      • Rental Ideas
      • Budget Decorating
      • My eBook
      • Decorating Tips
      • The Florida House
    • DIY
      • Before & Afters
    • Crafts
    • Organization
    • Holidays
  • Shop
    • Shop my Christmas Decor
    • Shop Our Home
    • Shop My Instagram
    • Favorite Throw Pillows
  • Media
    • Contact Me
    • Advertise
    • Disclosure
  • Nav Social Menu

    • Facebook
    • Instagram
    • Pinterest
    • Twitter

Making Home Base

  • Home Tour
  • DIY Projects
  • Shop Our Home
    • Shop My Instagram
    • Favorite Throw Pillows
  • Shop My Holiday Decor

Decorating Freebies

Sign up for FREE access to the vault of a dozen decorating freebies from planning printables to decorative wall prints.

October 17, 2012 62 Comments

Sisal Rope Coasters – Easy Nautical DIY Tutorial

Filed Under: DIY, home decor, My Home, My projects, tutorial 62 Comments

17305shares
  • Share
  • Tweet

I’m sharing a fun and easy way to bring some nautical decor into your home today.

DIY Nautical Sisal Rope Coasters.

If you’ve been around here awhile then you know by now that I have a love for nautical decor. It makes appearances all throughout my house.

DIY Nautical Stenciled Coasters

This is a super easy DIY project that only requires a glue gun, sisal rope, and if you want a stencil and paint. Ready?

Nautical Sisal Rope Coasters - Easy DIY Tutorial

Sisal rope comes in this huge roll. I think it costs around $5.00 for a whole roll. Another reason why I love it, it makes a very inexpensive project!

Nautical Sisal Rope Coasters - Easy DIY Tutorial

To make the sisal rope coasters I coiled the rope tightly hot gluing them the whole way around. One great thing about these coasters is that you can make them as big or as small as you want.

Nautical Sisal Rope Coasters - Easy DIY Tutorial

The anchor stencil for the nautical sisal rope coasters was created using my Silhouette Cameo but you could use any stencil you’d like. I think a monogram would be really cute too. To ensure the paint didn’t bleed under the stencil I used the same Mod Podge trick I used when I painted my DIY door mat. I allowed the Mod Podge to dry and used a small paint brush to paint one coat of black craft paint.

Nautical Stenciled Coasters
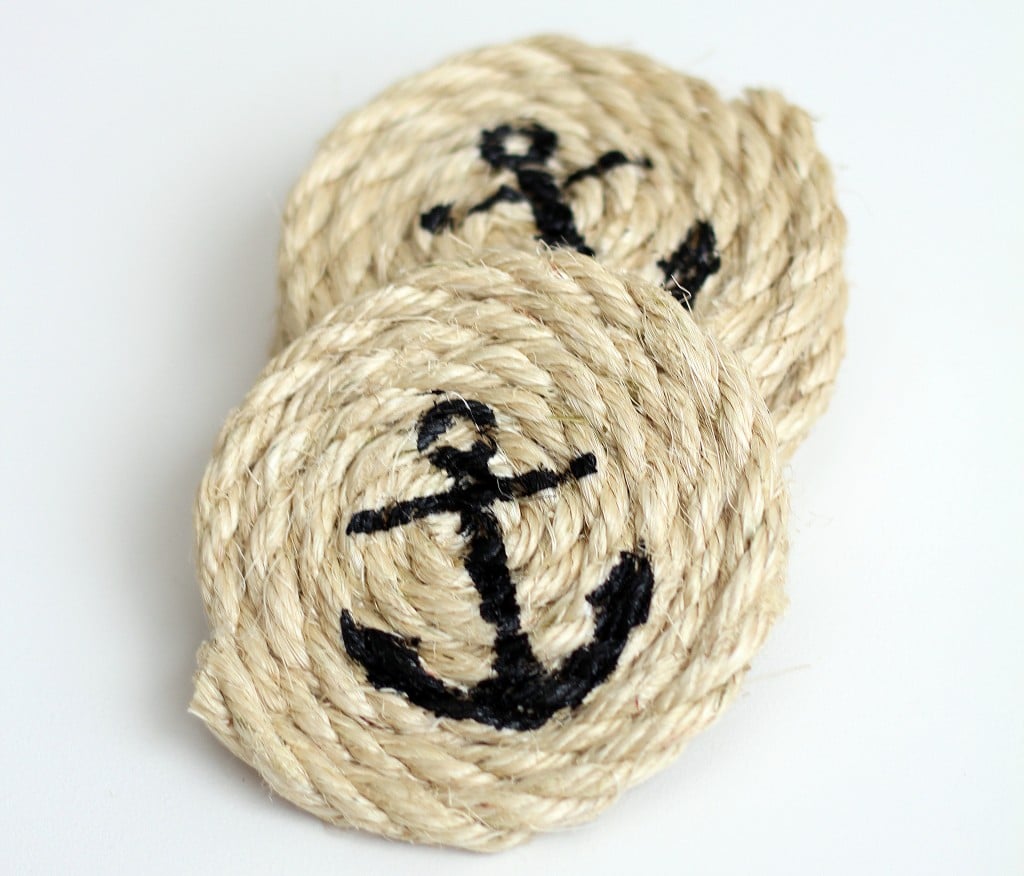
Once it was dry, I gently peeled off the vinyl. The anchor stencil looks perfect to me and gives that extra special beachy feel.

Don’t stop here! You must check out these other sisal rope DIY projects here.

Nautical Inspired Sisal Rope Home Decor

Related Posts

  • How to Bleach Wood FurnitureHow to Bleach Wood Furniture
  • Decorating Cinnamon Rolls TreesDecorating Cinnamon Rolls Trees
  • DIY Framed CorkboardDIY Framed Corkboard
  • How to Add a Peel and Stick Kitchen Backsplash in a RentalHow to Add a Peel and Stick Kitchen Backsplash in a Rental
  • Sourdough Cinnamon RollsSourdough Cinnamon Rolls

About Chelsea

Chelsea Coulston is the resident decorator, baker, and pillow hoarder around these parts. A wife to an active duty Sailor and mom of two girls, Chelsea's got a knack for decorating even the most challenging spaces (just see her military base house!) She's inspired by cool beach tones and warm natural elements that remind you of a day at the beach. After living in a half dozen rentals, she's enjoyed spending the last few years in a cute ranch style home that she and her husband have almost completely renovated themselves. Chelsea lives in sunny Jacksonville, Florida with her husband and two daughters.

Previous Post: « Uniform Rag Wreath
Next Post: Painted Jack O Lantern Treat Bowl »

Reader Interactions

Comments

  1. Katie says

    October 18, 2012 at 3:37 pm

    How fun! These are super cute! I would love to have you share these at my link party going on right now

    http://www.pincushioncreations.com/2012/10/homemade-by-you-34.html

    Reply
  2. Cynthia says

    October 18, 2012 at 3:00 pm

    How fun! I have yet to make anything out of sisal rope, but I love the look.

    Reply
  3. Amanda says

    October 19, 2012 at 5:56 am

    These are so cute! Great idea!

    Reply
  4. [email protected] says

    October 19, 2012 at 11:30 am

    What a cute idea! So simple yet they really pop! Stopping over from Craftberry Bush.

    Reply
  5. Gail says

    October 19, 2012 at 3:44 pm

    I’m your neighbor at Debbie Doo’s Pinterest Party and I have just pinned this cute idea!

    Reply
  6. Tanya says

    October 19, 2012 at 4:50 pm

    Here from the POP party, these are awesome! Just pinned 🙂

    xoxo, Tanya

    Reply
  7. Britni says

    October 19, 2012 at 10:40 pm

    Oh my gosh! These are too cute, Chelsea! What a great idea. So clever and pretty. And I have to say, I love your blog design. I have a bit of a “tab” obsession going on over on my blog, and wish I had found this layout before I bought mine 😉 I would be thrilled if you shared this at my Throwback Thursday party! I hope to see you there and thanks for sharing 🙂 http://www.hubbymademe.com/throwback-thursday-no-15/

    Reply
    • chelsea says

      October 20, 2012 at 1:52 pm

      Thank you so much Britni! I love your blog. I stop by often 🙂

      Reply
  8. Elizabeth @ Lizzi's Creations says

    October 25, 2012 at 7:32 am

    These are absolutely adorable! And you make them look so easy to make too! Thanks for sharing!

    Reply
  9. Monica Diaz says

    October 25, 2012 at 10:30 pm

    you could sell your crafts!

    Reply
  10. Beckie says

    November 12, 2012 at 5:36 am

    These are too cute! Great tutorial and love the design.

    Reply
  11. Chelsea says

    January 1, 2013 at 5:48 pm

    These are so cute! Love the layout and look of your blog! If you don’t mind me asking who did it? I want to have mine made over in 2013.

    Great name by the way! 🙂

    ~Chelsea
    http://www.marriedfilingjointly.blogspot.com

    Reply
  12. Katherine C says

    February 20, 2013 at 9:56 am

    Thank you for this idea! I will be using it for something other than a coaster. I will post a pic for you to see once I have finished my project! Thanks!

    Reply
  13. Jill @ Create.Craft.Love. says

    March 17, 2013 at 6:08 pm

    So cute! Love the nautical look!

    Reply
  14. Lauren @ The Thinking Closet says

    March 23, 2013 at 9:55 am

    I clearly need to get my hands on some sisal rope! Such a cute project.

    Reply
  15. Martha says

    December 17, 2013 at 12:59 pm

    this is a very nice idea. I have not been crafting much in about a year and a half now. trying to get new ideas and back into crafting, I think people will be happy to get these as a gift. maybe in a set of 4 or 6 . thanks .
    Martha

    Reply
  16. Martha says

    December 19, 2013 at 11:13 am

    well I got the rope and made one so far. got to get time to go get the Mod Podge and the craft paint also. will make them for later gifts. thanks again for the great idea. will probably make personalized coasters. need to get ribbon to wrap around them also. .

    Reply
  17. youtube.com says

    January 2, 2014 at 11:49 am

    I do not even know how I ended up here, but I thought
    this post was great. I don’t know who you are but definitely you’re going to a famous blogger if you are not already 😉 Cheers!

    Reply
  18. Katie says

    May 1, 2014 at 7:06 pm

    Love these! I am slightly obsessed with nautical stuff lately!

    Reply
  19. Celeste B says

    August 6, 2014 at 4:15 am

    How do you seal the paint so it doesn’t bleed when it gets wet from condensation from a glass?

    Reply
  20. Iryna @ RedBarberry.com says

    May 11, 2015 at 10:20 am

    these are so cute!

    Reply
  21. chi phí xây hồ bơi gia đình says

    December 7, 2017 at 3:11 am

    Thank you very much

    Reply
  22. Anndrea Marchand says

    October 3, 2018 at 9:28 pm

    How big is the stencil that you used? What does the stencil that you use measure?

    Reply
    • Chelsea says

      October 9, 2018 at 1:48 pm

      Hi Andrea, it probably was about 2.5″ no more than.

      Reply

Leave a Reply Cancel reply

Your email address will not be published. Required fields are marked *

Recipe Rating


Primary Sidebar

Hi! I’m Chelsea!

I'm Chelsea. Wife to Matt, and mama to P and Millie. I'm a fan of making and decorating things and everything blue + white. I believe that there is no such thing as too many throw pillows. Lover of iced coffee and cocktail Fridays. I'm glad you're here.

Follow Along

facebook instagram pinterest twitter

Search

Home Tour

Archives

  • Privacy Policy
  • Annie the Brave
  • How To Start A Blog
#ad Homeschool/General parent “pro” tip - buy #ad Homeschool/General parent “pro” tip - buy a shower caddy and stuff it full of art supplies to keep your kids from having their markers and crayons all over the place. For real though, this was a game changer. Previously, I had one hard and heavy caddy for all of our supplies that I would plop on the table during our school day but I found my kids constantly getting up to grab a pink crayon or the blue marker. Or at the end of the day things weren’t getting put away properly and the next day we couldn’t find the glue or the scissors. Now, they each have a caddy that they are responsible for. I’ve partnered with @walmart to share this simple organizing solution. The girls keep their supplies together and carry the caddy around to wherever they choose to school that day/minute. I used my Walmart+ membership again to pull this off. I was able to order all the art caddy necessities online using the W+ free shipping, no order minimum (excludes oversized/freight & Marketplace items) benefit so I can limit my time in stores. #walmartplus
Sitting here thinking about everything that’s go Sitting here thinking about everything that’s gotten me through this last year.
1. My family - having my girls home has been everything I never knew I needed. 
1a. My mom - in those early pandemic days, when we didn’t leave the house, she would meet me halfway between here and Vegas. We would sit in the middle of the desert with our masks on and just visit. I needed that so much and I know she did too.
2. My friends - it’s hard to imagine making it through this year without the friendships I have. They’ve carried me. A small group of neighbors here that would meet at the park for some outdoor fellowship and our weekly dinners made life feel a little more normal. Having regular calls with my best friend in FL was gold especially since we can’t see each other. And regular chats with @bykaithanson got me through especially in those early days.
3. Regular therapy - if I wasn’t already going before all this happened I surely would need to now. This all is very heavy stuff and having someone that is outside your circle to talk to is so important. This saves me again and again.
4. Making bread. I started making last year so when it blew up during that first quarantine I was so excited that we all were baking together. Whenever I’m feeling anxious making dough helps.
5. Exercise - this was the year I finally made exercise a priority. I love how much better I feel when I move my body each day. I’m less anxious and I’m more at peace.
6. All the technology that connects us. Marco Polo, FaceTime, texting, FB Messenger, all of it. Being able to reach all of my loved ones with the tips of my fingers has made it a lot easier when I can’t see them.
7. Television - how many shows have we binged this year? I don’t even know but I remember tackling Friday Night Lights in the beginning of the pandemic and being so sad it was over. 
8. This community. One thing I wanted in 2020 was to CONNECT with you all here and that has happened and its been wonderful getting to know each of you!
💙
We’ve been through a lot this year what has carried you? Tag a friend that’s gotten you through. 
Hoping and praying for a truly happy new year. 💙💙
Merry Christmas from our home to yours! I wish you Merry Christmas from our home to yours! I wish you everything good this Christmas and in the new year. 🎄
#ad Fun festive morning with the girls! My girls l #ad Fun festive morning with the girls! My girls love making and baking anything! We made cinnamon roll Christmas trees then decorated them with m&ms and sprinkles. I bought everything from Walmart, used canned cinnamon rolls to make them quick and easy so we could focus our energy on decorating them. Holiday memories made! How are you making memories with your family this season? @walmart http://liketk.it/34rdO #liketkit @liketoknow.it #walmart
I want to hear about your collections!! I don’t I want to hear about your collections!! I don’t collect much but I do have a few Christmas things that I’ve been collecting over the years. These nutcrackers are one. The girls pick out a new one each year. I have a small collection little white village houses and since the first year we were married we bought a peace dove ornament from Pier 1 (Li Bien brand) - they quit selling them so this will be the first in 14 years that we don’t get one of those. What do you collect???
Military base house kitchen but make it Christmas! Military base house kitchen but make it Christmas! 🥰🥰🥰🎄
I really don’t love this kitchen but I’ve worked hard to make it easier on the eyes with a faux backsplash and with some mini wreaths on the cabs. Feelin’ festive. Sources for the backsplash are on the blog + @liketoknow.it 👍

Copyright © 2021 ·Captivating Theme · Genesis Framework by StudioPress · WordPress · Log in

Privacy Policy
This website uses cookies to improve your experience. We'll assume you're ok with this, but you can opt-out if you wish.Accept Read More
Privacy & Cookies Policy
Necessary
Always Enabled