DIY Monogram Photo Clipboard From Scrap Wood
Hi everyone!
Today I am super excited to be participating in Kristen Duke’s Decorating with Pictures Series. She’s got an incredible line up of over 50 blogs sharing their ideas and inspiring photo projects. For my project, I want to share with you guys the small gallery wall I put together for our bedroom and the DIY Monogram Photo Clipboard that I made for it. After you check it out be sure to pop over to Capturing Joy with Kristen Duke to enter to win the giveaway to Strawberry Mommy!


I had some 11×14 photos printed from our family photo shoot in December and when I ran to IKEA for some RIBBA frames I quickly realized their RIBBA frames don’t come in that size (they are slightly off at like 11.5×15 or something close to that). So instead of using this photo as I had originally planned I wanted to create something a little bit different that could accommodate a large photo but wasn’t your average photo frame. After a little brainstorming I came up with this monogram photo clipboard.

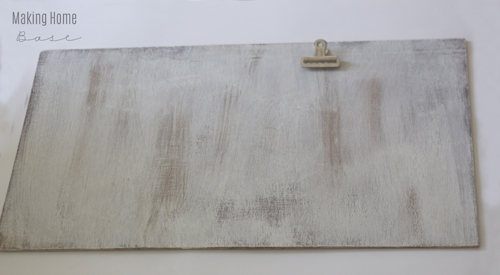
For this project I grabbed a piece of scrap wood that was leftover from making this hanging chalkboard. I dry brushed the whole thing with some white paint. Then I sanded it down in a few areas with fine grit sand paper to get the perfect weathered looked.
Then I hot glued a large bulldog clip to the board. (Make sure you test out precisely where you want the clip before securing it with glue.)

The monogram came as an afterthought really. I was going to put some sort of quote here but Silhouette was acting funny. One of those happy accidents, I suppose because I think this turned out way better. I created a stencil using my Silhouette on a 8.5×11 piece of card stock for the monogram and est. date.

I used a small craft brush to paint in the stencil. I used a dark blueish gray, the same color as the dresser that the gallery wall sits above. Only using one coat with very little paint, just dabbing it on. I knew I would want a distressed look so less paint is better for sanding. After allowing it to dry for several minutes I sanded it lightly with fine grit sand paper. I gave the whole thing a coat of protective wax as a finishing step.

Besides being absolutely FREE, my favorite thing about DIY Monogram Photo Clipboard is that you can easily switch out the photo! I love when happy accidents result in something so one of a kind and lovely, don’t you? I’m loving our new gallery wall space. If you want to see how I made the gold heart couple’s art check out that tutorial here.
Be sure to visit Kristen’s blog to see the entire Decorating with Pictures Series and enter to win the Strawberry Mommy Giveaway! And if you’d like to stay connected with me I’d love to have you follow along on Instagram or Pinterest!
![Little Girls Bedroom [Source List]](https://www.makinghomebase.com/wp-content/uploads/2014/04/Little-girls-bedroom.jpg)


Oh I just love this idea. I started another project that had you using bulldog clips but not I can’t find them anywhere. Where did you find your clips?? And please don’t say hobby lobby because I don’t have one
Oh and there was a crying emoticon on my last comment. Haha. All the good stuff comes from hobby lobby and there isn’t one anywhere near here. 🙁
So cute Chelsea! I love this!
LOVE this!
Chelsea, I ADORE this project. What a fabulous way to showcase photos and I love that you made it from scrap wood! So thrifty! Pinning 🙂
This turned out great, Chelsea! I love how the whole photo wall looks, everything looks so nice together! 🙂
Such a cute idea, love it!
PS, I’m stopping by from East Coast Creative, I’m their new blog assistant! 🙂
I love this! It looks beautiful on your gallery wall, too. I just got a Silhouette, so I am excited to make something similar. Thanks for the great idea. Pinning!
So cute! I love it! It looks great as part of your little gallery wall!
I LOVE this Chelsea- I really think I want to make one- thanks for the tutorial and sharing your great idea!!
I love this! I just got my Silhouette and am pretty much afraid to touch it, but I can’t wait until I’m making cute things like this! Thanks so much for sharing, Chelsea!
~Abby =)
I ran into the SAME issue with those Ribba frames recently! This is infinitely better though, so I guess it”s good the RIbbas didn”t work out 😉
Love everything about this, including your beautiful little family!
I do wish I had a silhouette. It seems to make lots of happy accidents. This really is a stunning project. Im glad you shared it. I found you through Just a Girl, I’m following you through all your social media. Leaving an open invitation to follow back! Xo
I have sold old rusty clips that I have been wanting to use on some scrap wood, but I LOVE how you added the established stencil on there too! Plus the whitewash is so pretty. Pinned 🙂
sold = some. haha
This turned out gorgeous Chelsea!! I love the entire wall you have, it is super modern rustic… beautiful.
love, love this idea! Checking it out from think pink Sunday and this this is a super crwative idea! LOve the decorative collage!
Cathy
http://www.threekidsandafish.com
Hi Chelsea, me again! Would love to see your projects at Link It Or Lump It Link party!! Stop by and visit if you have a chance http://www.sohosonnet.com/link-it-or-lump-it/link-it-or-lump-it-link-party-28/
Will you make me one???