• Home
  • Start Here
  • About
  • My Home
    • My Home Tour
    • Paint Colors
  • DIY/Decor
    • Decorating
      • Rental Ideas
      • Budget Decorating
      • My eBook
      • Decorating Tips
      • The Florida House
    • DIY
      • Before & Afters
    • Crafts
    • Organization
    • Holidays
  • Shop
    • Shop my Christmas Decor
    • Shop Our Home
    • Shop My Instagram
    • Favorite Throw Pillows
  • Media
    • Contact Me
    • Advertise
    • Disclosure
  • Nav Social Menu

    • Facebook
    • Instagram
    • Pinterest
    • Twitter

Making Home Base

  • Home Tour
  • DIY Projects
  • Shop Our Home
    • Shop My Instagram
    • Favorite Throw Pillows
  • Shop My Holiday Decor

Decorating Freebies

Sign up for FREE access to the vault of a dozen decorating freebies from planning printables to decorative wall prints.

May 18, 2016 15 Comments

DIY Pottery Barn Inspired Nightstands

Filed Under: Building Projects, DIY, Master Bedroom, My Home, My projects, tutorial, Wood 15 Comments

2788shares
  • Share
  • Tweet

For your convenience, there are affiliate links below. That means, at no additional cost to you, I may make a small commission on your purchase. Thank you so much for supporting MHB. Click here to read my full disclosure policy.

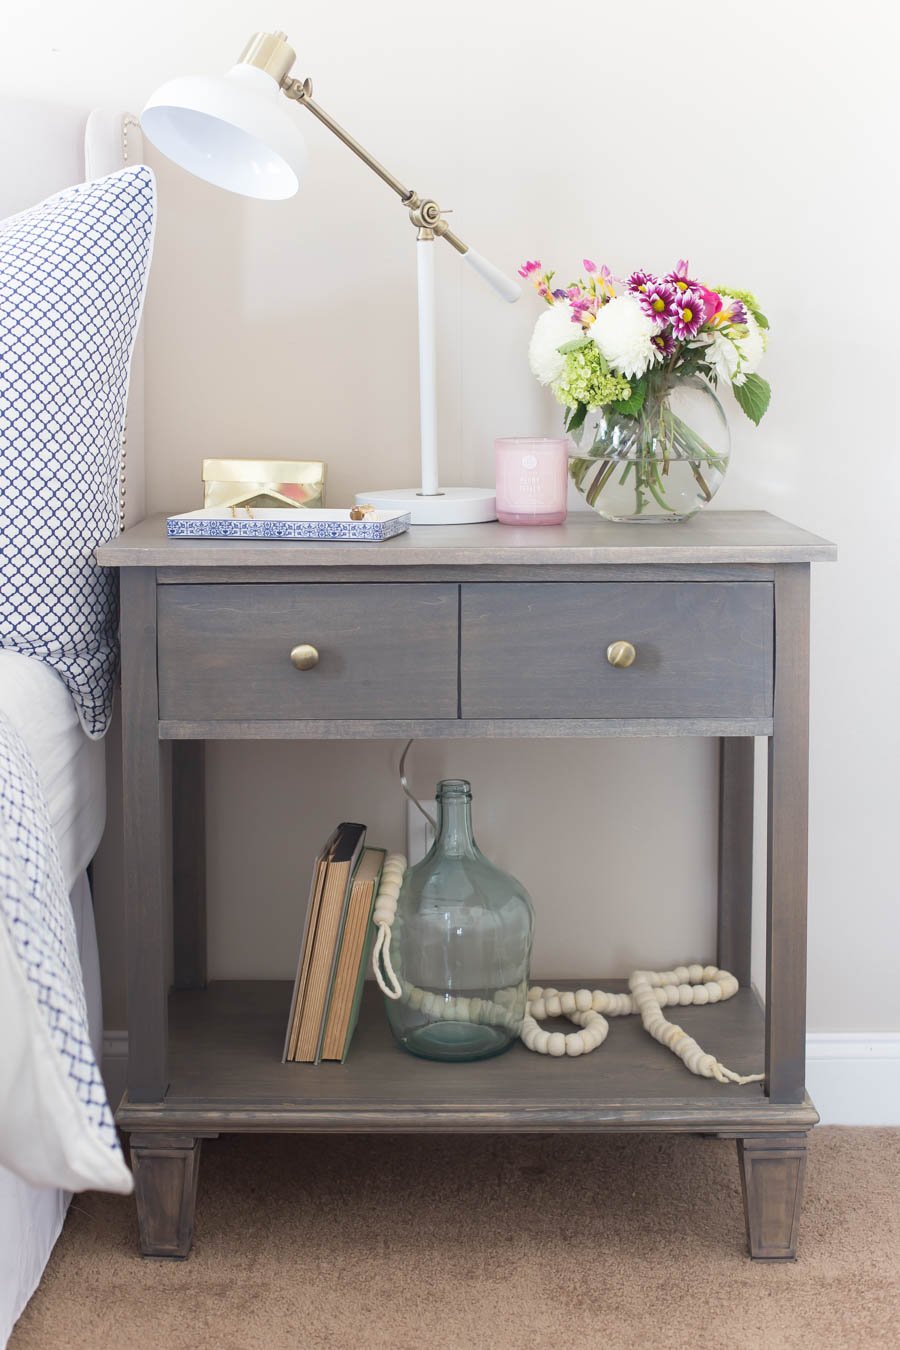
Priority number one for the “finish the master bedroom project” was to find proper nightstands.

I searched high and low for something that I loved + suited the space + wasn’t a gazillion dollars and I finally determined that it didn’t exist. I fell in love with the Sausalito bedside table from Pottery Barn early in my search and could never get it out of my head. The $499 price tag instantly made it out of reach. My sweet friend Jen from The House of Wood swooped in and saved the day by whipping up some plans for me that made building these DIY bedside tables so easy that I still can’t believe we pulled it off!

Pottery Barn Inspired Nightstand

PLANS button

The first step of our nightstand build was collecting the materials. We ended up purchasing the lumber from The Home Depot. I really wanted to try using a hard wood like maple but I couldn’t find a lumberyard locally that had everything in stock. Also, this was our first “real” piece of furniture that we’ve built so I wanted to be sure we could do it before spending on the “good stuff.” We ended up using Poplar which ended up being great to build with but not the easiest to finish.  Next piece we build I’m totally going for the maple! I reached out to the wonderful folks at Osborne Wood for the furniture feet. They have such a great selection and the Mission Sofa Leg was the perfect choice for our nightstands.
Chelsea Nightstand

We took our cut list to The Home Depot and had them cut the large pieces for us and then we cut the smaller, more precise cuts using the Table Saw from Ryobi.

I wanted a beachy, weathered look similar to the PB version. Since the poplar wood has a bit of a green tinge, I was really apprehensive about how it would stain. Instead of attempting to mix stains and get the PB look, I grabbed my favorite gray stain and I’m so glad I did.

Chelsea Nightstand-3

We followed Jen’s plans to a tee and both nightstands ended up taking severals days working on them several hours per day. Matt ended up building one nightstand completely before beginning on the next one. He mentioned that next time he would try to work on them at the same time to save time.

Chelsea Nightstand-2

These nightstands totally changed the look and feel of our room all on their own I can’t wait to add the other elements that I’ve been planning.

Chelsea Nightstand

You can snag the plans for this nightstand over on The House of Wood, just click the button below. Jen is amazing, so go give her some love! And can you believe, these nightstands are mine? And that we made them?!!!!!!! <—— Yes, I need that many exclamations points. That’s how excited I am about this! Happy Wednesday 🙂
PLANS button


Related Posts

  • How to Bleach Wood FurnitureHow to Bleach Wood Furniture
  • Plans For Our Modern Coastal BedroomPlans For Our Modern Coastal Bedroom
  • How to Install Removable WallpaperHow to Install Removable Wallpaper
  • Casual Coastal Master BedroomCasual Coastal Master Bedroom
  • Kids Closet Makeover with an IKEA Closet OrganizerKids Closet Makeover with an IKEA Closet Organizer

About Chelsea

Chelsea Coulston is the resident decorator, baker, and pillow hoarder around these parts. A wife to an active duty Sailor and mom of two girls, Chelsea's got a knack for decorating even the most challenging spaces (just see her military base house!) She's inspired by cool beach tones and warm natural elements that remind you of a day at the beach. After living in a half dozen rentals, she's enjoyed spending the last few years in a cute ranch style home that she and her husband have almost completely renovated themselves. Chelsea lives in sunny Jacksonville, Florida with her husband and two daughters.

Previous Post: « Find Your Decorating Style
Next Post: Selecting Shower Tile – Tips »

Reader Interactions

Comments

  1. JenWoodhouse.com says

    May 18, 2016 at 8:30 am

    CHELSEA!!! They turned out amazing!! Next up: maple! Thanks again for letting me be a part of this! xoxo

    Reply
  2. April Hoff says

    May 18, 2016 at 3:11 pm

    Wow! They turned out great, Chelsea! Matt did a great job, and I love Jen’s plans! xo

    Reply
  3. Jessie G. says

    May 23, 2016 at 1:35 pm

    So..:what stain did you use?

    Reply
    • Chelsea says

      May 31, 2016 at 3:09 pm

      Minwax Weathered Gray stain.

      Reply
      • jessica says

        August 21, 2017 at 4:59 pm

        I have literally looked everywhere for this stain or a similar version. do you have a link you could provide? I am only finding a classic gray made by minwax.

        Reply
        • Chelsea says

          August 21, 2017 at 9:42 pm

          Hi Jessica, it’s my fault – it’s Minwax Classic Gray here: http://amzn.to/2wiWFo5 – Rustoleum makes a Weathered Gray that is beautiful as well. But this project we did the classic gray – another option for a gray stain is what we did with our console table: http://www.makinghomebase.com/beachy-console-table-diy-friday/ we did a combo of stains. Shoot me an email if you have any questions!

          Reply
  4. julie spear says

    July 6, 2016 at 6:20 pm

    GORGEOUS!!!!!!! And yes, I need that many exclamation points! I have been itching to het building, since my kids have been progressively buying me items off my tool wish list over the last couple years! I have been making myself finish all ‘work in progress’ projects, before I start anything new, which also clears space in my garage, LOL! Great job, guys!!!! I am totally going over to H.O.W. next for these awesome plans! JEN BUILDS AMAZING STUFF!! Thanks for sharing!

    Reply
    • Chelsea says

      July 16, 2016 at 9:02 pm

      Jen does build amazing stuff and what is even better is that she shares her brilliance with all of us so we can build awesome stuff too! Enjoy!

      Reply
  5. Daniel D Ryan says

    November 14, 2019 at 10:34 am

    They look great! I was thinking of doing the same. How much did the materials cost? Thanks in advance!

    Reply
    • Chelsea says

      November 14, 2019 at 10:14 pm

      Hi Daniel, to be honest I don’t remember – it’s been awhile I would guess it was about $250 for both.

      Reply

Leave a Reply Cancel reply

Your email address will not be published. Required fields are marked *

Recipe Rating


Primary Sidebar

Hi! I’m Chelsea!

I'm Chelsea. Wife to Matt, and mama to P and Millie. I'm a fan of making and decorating things and everything blue + white. I believe that there is no such thing as too many throw pillows. Lover of iced coffee and cocktail Fridays. I'm glad you're here.

Follow Along

facebook instagram pinterest twitter

Search

Home Tour

Archives

  • Privacy Policy
  • Annie the Brave
  • How To Start A Blog
It’s been a whole year since my dining my room l It’s been a whole year since my dining my room looked like this. It’s been a long year, hasn’t it? This space is regularly filled with books and school supplies and two giggling girls. I don’t know if we ever go back to normal from here but there’s a lot from this time that I want to take with me in to the future. How about you? 
Linked everything on @liketoknow.it 

http://liketk.it/3cXlF #liketkit #LTKhome #serenaandlily #potterybarn #rentalliving #howirent #howihome #milspouse #bhgstylemaker #homedecorinspiration #coastalliving
My kids fight all day long but when the time comes My kids fight all day long but when the time comes for them to go to sleep they snuggle up in the same bed and it gives me allll the mama feels. It’s getting pretty tight on the top bunk with them squeezed into a twin but they never complain.

The dots on the wall are little decals for a faux wallpaper look. We love them. I linked them and everything else from the girls room on @liketoknow.it http://liketk.it/3cpo9 #liketkit #LTKkids #howihome #bhgstylemaker #kidsspaces #militaryhousing #milspouse #howirent #rentaldecorating @liketoknow.it.home @liketoknow.it.family
So many things happening today. Got my Covid shot So many things happening today. Got my Covid shot (🥳🥳🥳) and wrote a blog post. I want a prize. Kidding. Finally wrote all about that sconce hack. Rental friends - go to the blog and pin it for later! #rentalfriendly #howihome #sconcelighting #diyprojects #howirent #milspouse #militaryhousing
I think it’s safe to say that my favorite rental I think it’s safe to say that my favorite rental hack is temp wallpaper. I have a version of it in four rooms now. This one is my favorite, I think! #howirent #milspouse #basehousing #bhghome #howihome
My ideas do not always work out but this one did! My ideas do not always work out but this one did! I’m really proud of the way the canvas turned out. It was really fun to be creative in this way. I think this completely transformed our living room in such a great way. This is military base housing guys. Base housing. I almost don’t believe it myself... swipe to see the giant canvas we made before I painted it and our living room before! Also I added everything to @liketoknow.it if you are looking for sources! http://liketk.it/3b1lr @liketoknow.it.home #LTKhome #kismetcheckoutmyhouse #diylookforless #howirent #abmathome #howihome #basehousing #milspouse
Rudy turned 5 last month and I was reminded of how Rudy turned 5 last month and I was reminded of how crazy I was to get a puppy while v pregnant with Millie. Also, he wanted a permanent spot in the feed. Happy Saturday.

Copyright © 2021 ·Captivating Theme · Genesis Framework by StudioPress · WordPress · Log in

Privacy Policy
This website uses cookies to improve your experience. We'll assume you're ok with this, but you can opt-out if you wish.Accept Read More
Privacy & Cookies Policy
Necessary
Always Enabled