How to Build a Fireplace Surround – DIY Fireplace Makeover
A DIY fireplace makeover with a tutorial to build a DIY fireplace surround creating a beautiful updated fireplace. This tutorial covers how to update a 90s era fireplace by creating a beautiful DIY fireplace surround.

A fireplace is a focal point of a room whether it’s in a living space or a bedroom, whether it’s a showstopper or an eyesore, fireplaces make a big statement in any space. We recently gave our living room fireplace a whole new look by building a whole new mantel and surround. It was quite the transformation to go from our dated fireplace to the beautiful fireplace you see now!
How The Whole Thing Started
This whole project started as a real-life “If You Give A Mouse A Cookie” scenario. Matt and I were chatting about our living room fireplace some fireplace makeover ideas. We began discussing how we’d love to get rid of the faux marble surround and potentially add a new wood mantel.
That Saturday afternoon, the conversation quickly turned into curiosity and we began wondering what was behind the marble surround anyway? How difficult would it be to remove it? Could we DIY a mantel? The next thing I knew, while I was googling fire code for fireplaces, Matt was pulling the trim away from the fireplace wall just to see what was behind the fake marble. After about five minutes we had the entire surround removed from the wall and we were staring at each other trying to convince ourselves that this would be easy enough.
Our fireplace makeover was off to the races as we added this to our DIY projects list.
I reached out to my friends at Floor & Decor to ask if they might want to team up with me on this project. I was so excited when they agreed because I had my eyes on the most perfect gray hexagon porcelain tile.
Ripping Out the Faux Marble Surround

This may not be a great tutorial but I tried to be as detailed as possible when discussing the fireplace design and how we got through each step to get to the modern look we ended up with. If your fireplace surround has other materials like stone or is a brick surround you make have different steps than the ones I’ve outlined here.
Additionally, we did not replace the fireplace insert. We kept the existing fireplace. We simply gave it a more updated look by adding a surround and mantel, adding tile and wood to the hearth, and spray painting the hardware.
How to Build a Fireplace Surround
To build the fireplace surround, we first started by pulling off the existing faux marble surround. When we pulled off the faux marble the fireplace looked like this. We started by tiling the fireplace surround. Since we were building out a fireplace surround we knew it would be larger than the previous so we also pulled off a portion of the baseboard on both sides of the fireplace. Since we just had drywall all the way around the fireplace, we had to reinforce it with cement board before placing the tile.
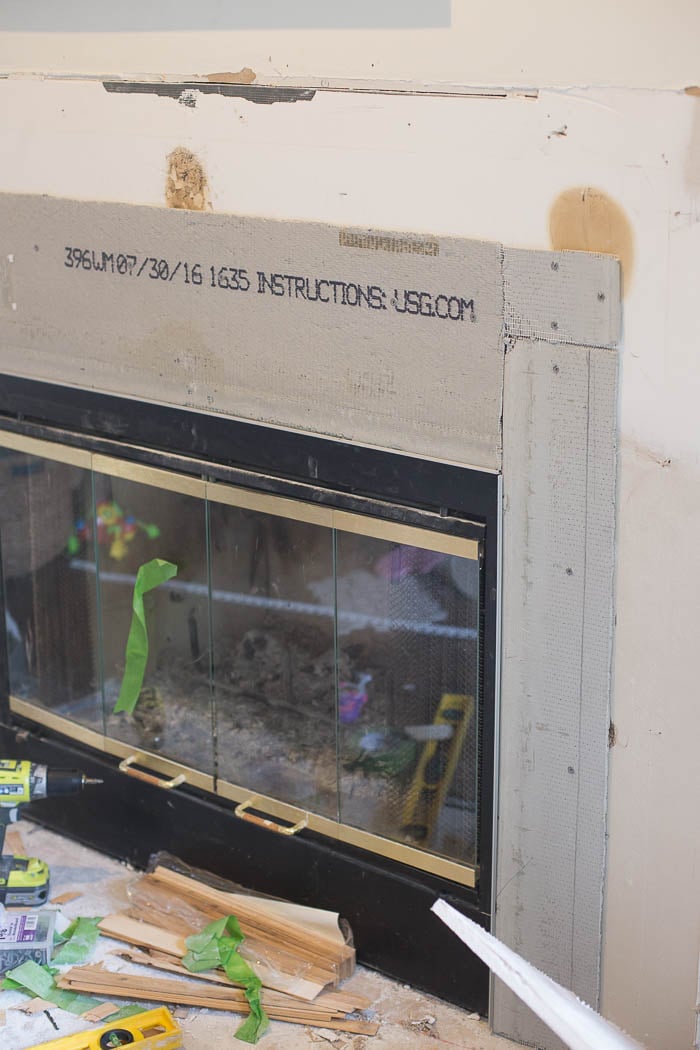
To prepare the fireplace surround for tile, we added some 1/2 inch edging around the fireplace, called an aluminum Schluter, to give a nice clean edge where the tile meets the fireplace. It’s installed behind the cement board so that it would be flush with the fireplace. You can see it in the photo above. If you don’t use cement board you could use an even slimmer Schluter edge.
I’m going to go into detail about how we assembled our fireplace surround, keep in mind to follow your state’s fire code guidelines. Here are a few quick details: Our final measurements for the fireplace are as follows: 55 inches wide, with the mantel being 70.5 inches, and 53 inches high. Of course, you’ll be building your according to the size of your space but just as a general FYI.
We later painted the gold hardware black with fireplace paint.
Since we knew we would be building out a surround and mantel, we only added about six inches of cement board where we would be placing tile.
SUPPLIES WE USED FOR THE TILE
- 10 square feet of gray hex tile
- Mastic – we use this premixed stuff instead of mortar
- Grout – Avalanche White
- Ryobi Tile Saw
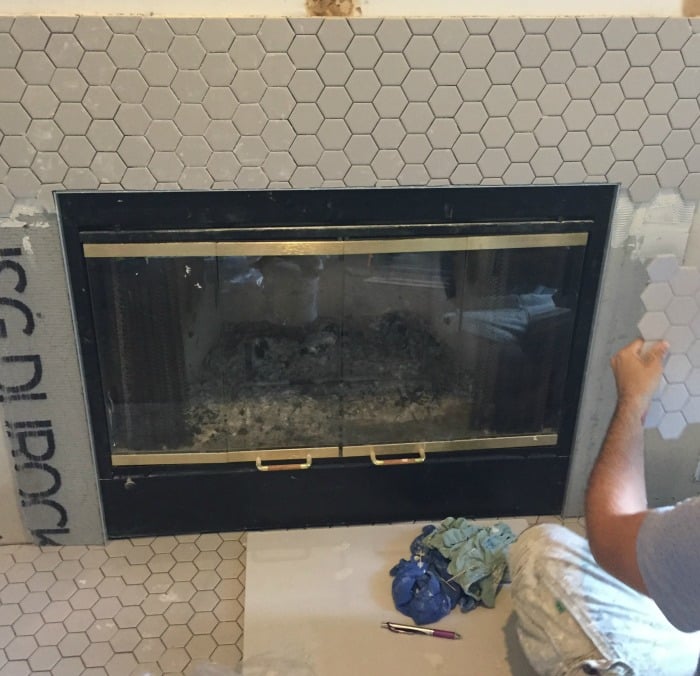
Matt was able to bust out the tiling in just an afternoon. It turns out that these hex tiles are WAY easier than the herringbone marble we used in our kitchen.
We grouted the tile the next day. I love the way the white grout pops on the gray tile!
Next, it was time for the real makeover to begin – out with the old fireplace and in with the new building the fireplace surround was the complete game changer!
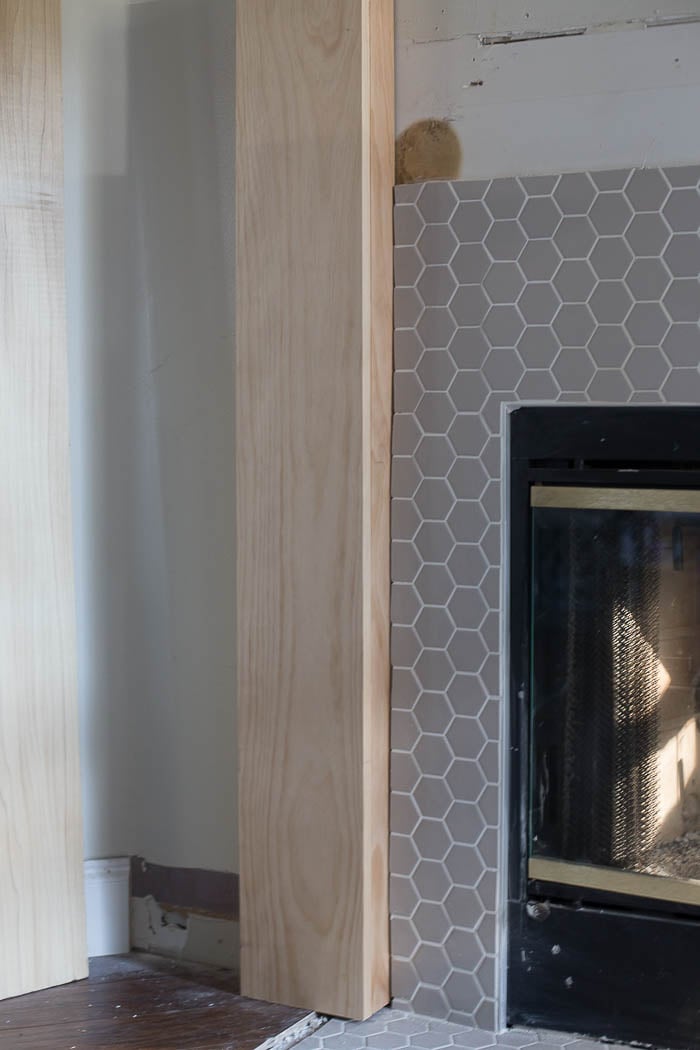
We wanted two columns on either side of the fireplace with a chunky mantel. It’s kind of a modern take on a traditional mantel style. You can find our inspiration here and here.
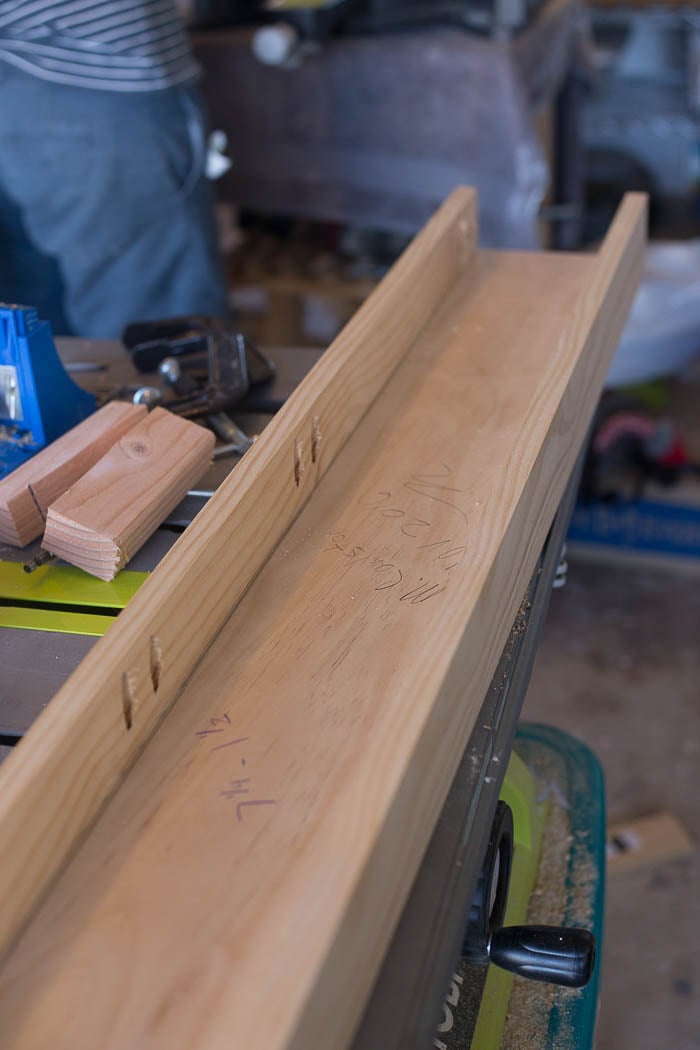
To build the column, Matt essentially built a “C” frame using a 1×6 and two 1×3 pine boards. He joined them together using the Kreg Jig pocket hole system. This allows you to join corners together without any screws exposed on the outside.
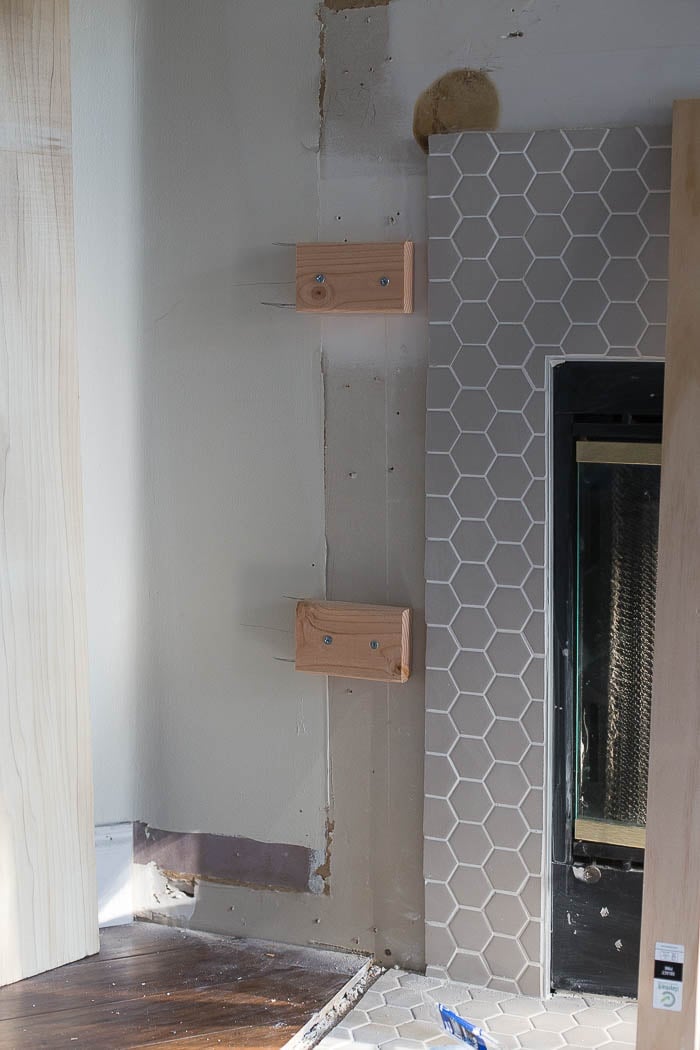
He used pieces of 2×4 cut down to allow the column to fit snugly around them and then secured the column to the pieces of wood using our brad nailer. Notice the marks on the wall – he marked the wall with a pencil so he would know exactly where the 2×4 blocks were when it was time to nail the column in place.
I got a little excited as we moved forward quickly from here so I missed a photo of the next step which was to attach the 1×10. And actually, ours is a 1×8 (you can see the gap between the front board and the top of the mantel in the image below). We originally got a 1×10 piece of wood and it was warped so we decided not to use it. When we went to grab another piece we picked up a 1×8 by accident. We didn’t want to make another trip out and the gap is covered by trim so… use a 1×10 to avoid this piece work! 🙂
Again, we used 2×4 pieces with shims jammed in to cover the difference and to make it flush with the columns. Then nailed the front board into place.
For the fireplace mantel, we framed out a 1×8 board with 1×2 pieces with mitered corners to create a chunky-looking mantel top (it adds charm). We nailed the top to the 2x4s and straight into the columns. You’ll also notice Matt added a few pieces of 1×2 in the gap so that the mantel top would be really secure – if you get the right size board (1×10) to begin with you wouldn’t need to do that.
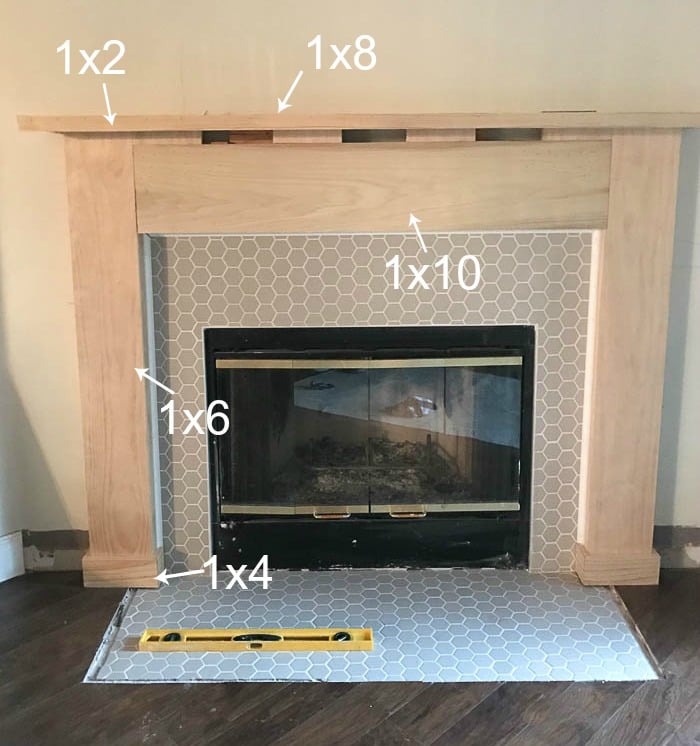
After the mantel was up we started to add the trim – this is where you can be creative to get the fireplace look you dream of. For our fireplace makeover, we added 1×4 around the bottom of the columns, and then put 3/4 in cove molding in around the perimeter of the fireplace. This was to hide the cut edges of the tile and any imperfections.

We added crown molding directly under the mantel, then added a piece of 1×2 directly underneath it to chunk it up even more.
To trim out the rest of the mantel, we used 1×2.

Once all the trim was finished, we sanded the entire thing down with an orbital sander to get a smooth texture. Then we caulked all of the many brad nail holes and seams and finished it with paint. We painted two coats of Benjamin Moore Chantilly Lace white paint and called it done.
Matt claims this was our biggest project yet since becoming homeowners. That’s probably because the building of the mantel was time-consuming that required a lot of precision – cutting crown molding is no joke, friends!

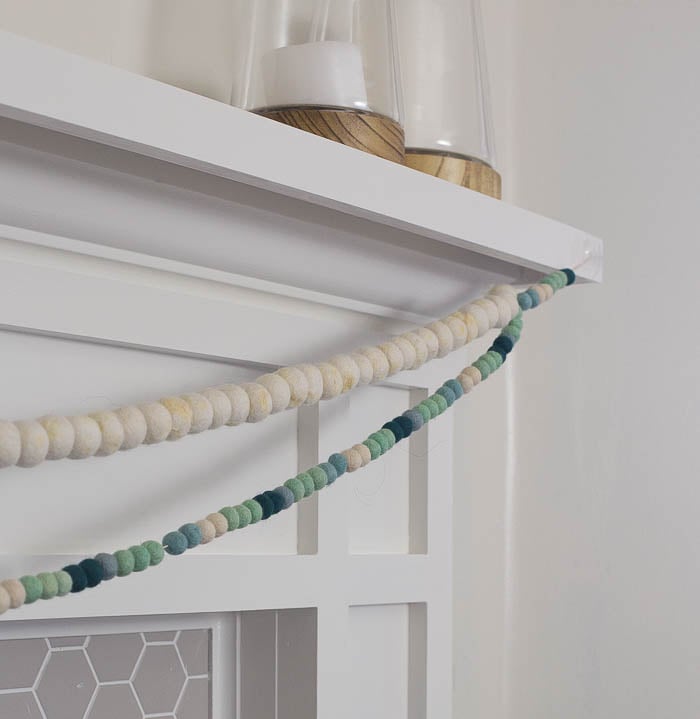
Of course, my favorite part of the entire project was decorating the mantel. I gathered accessories and decor pieces we had around the house like candles, vases, and the like. I’m still working on the perfect situation but I think I’ll change it up seasonally anyway!
As I mentioned before, to complete the transformation of our outdated fireplace we ended up painting the brass hardware BLACK. You can see the easy and cheap process of using high-heat paint to update your fireplace here. I’m so proud of the way our fireplace makeover (and especially the DIY fireplace surround) turned out. It’s a whole different vibe in this space now and I love it. It’s the best feeling when an idea you have turns into a real-life beautiful project you love!
For more DIY projects that we’ve completed and are proud of see: DIY built-ins and DIY board and batten.

Pin for later:


Wow!!! I love this! The mantle design you came up with is my fav – love the trim design. It looks so crisp and fancy 🙂
I’m avoiding tile in our house out of #tilefear but I need to just go for it. And I think my husband will be for it because he loves getting a new tool when we need to do a new project Lol! I think he will be eyeing that Ryobi tile saw.
Thanks for sharing! I bet you are loving a fancy new mantle for Christmas
>> Christene
Keys to Inspiration
It turned out gorgeous. Nice work! It’s so fun when we get to see our visions come to life!
Thanks so much Jess! Exactly, it feels so good to have that project behind us! 🙂
Looks wonderful! Great project!
Thank you so much, Dina! It was a really fun project!
Beautiful! What a great job!
Hi Pat! Thank you so much! We’re so excited about it – I can’t wait for you to see how we decorated it for Christmas! 🙂
This looks amazing! About how much would you say the materials for the mantle cost? I’m currently renting an apartment with a gas fireplace in a really awkward spot, and it’s an eyesore. It doesn’t have a mantle and I’m trying to figure out a somewhat inexpensive way to add one. I don’t want to put too much money into it since I will have to remove it when my lease ends. I would probably have to attach it to the wall differently, but I’ve already put some pretty significant holes in the walls in order to hang some heavy things, so since that’s already going to be something i’ll have to deal with upon moving out I don’t really care if i have to add some more lol! I love the way yours looks and I want to attempt to build one very similar to it, depending on the cost.
The mantel itself (just the top part) wasn’t too costly, probably $40-50 for the wood and you could probably find it even cheaper depending on where you live. We have a hard time finding solid hardwoods here. The entire surround probably 100-150 bucks because of all the trim. Hope that helps!!
Do you happen to have a list of many pieces of plywood you had to get? And did you guys rip these to size yourself?
Really love your design and hoping to do something very similar.
Hey Jacob -thanks for the comment. We actually didn’t use any plywood. We actually used a combination of 1×6 and 1x3s for the columns and the middle piece is a 1×8 but we would recommend grabbing a 1×10. Hope that helps.
Hi Chelsea, this looks amazing!
Do you recommend building a “C” for the middle 1×10 column with 1x3s? You mentioned using 2x4s and shims?
Hi Walter, no need to create a “C” frame for the middle. You’ll nail the 1×10 board directly to the 2×4. Just like with the side columns – we attached pieces of 2×4 to the wall, then nailed the 1×10 to those 2×4 pieces. To make it super flush to the columns we added shims where needed. I hope that makes sense. The trim work covers any gaps.
Chelsea, have you thought about painting over the brass accents of the fireplace? We have the same brassy fireplace glass in our home and want to get rid of the dated look. I’ve heard of being able to cover it with a special high-heat paint. If you do, please do a blog post on it! I need some help and a tutorial!
Hey Kathy! Yes! Actually, it’s on my list (that’s a mile long and growing) 😉 Like you said, we’d have to use some high-heat paint. It’s something I’ve been meaning to do but just haven’t tackled. Might take it on this week now that you’ve reminded me! I’ll definitely share it here. Have a great weekend!
Hi Kathy, we did it! I posted about it here http://www.makinghomebase.com/fireplace-update-high-heat-paint/
Hi! It looks beautiful! We are about to take on a fireplace redo and I saw you said the paint color you used but what finish was the paint… satin, gloss, etc?? Thanks!
Hi Heather, we used a satin finish!
This turned out awesome!
We have been planning for a similar build out and mantel addition on our fireplace. Do you happen to know the measurements of the fireplace – tile on both sides and above – mantel height and the width of the “pillars”? I have been searching for quite some time and have even taped off our fireplace but I can’t seem to find a “ratio” that I like as far as wood to tile. I think yours is a great ratio.
Thank you and once again, great job!
Thank you so much for this. I’m going to use this as a step by step guide as I have an almost identical makeover on the todo list. Maybe the one thing I would do different would be raise the tile so there wouldn’t be a gap with the columns. Again, amazing job!
One of the best and clearest tutorials I’ve seen on mantle construction. Great pictures and text with a totally impressive finished result (good idea to use the back paint later to totally finish off the “new look”). This is such an improvement over what you started with. As with one of the other comments, I would like the measurements of the firebox, tile surround and mantle surround as your proportions are right on and could then be duplicated and either applied/adjusted to other fireplaces. Great and informative post.
Hi Chelsea, Thank you for posting this article/blog on your fireplace mantel redo. I love it! It is a fabulous step by step guide. First time I have seen a hex tile used in a fireplace in place of a herringbone. Gives me the courage to do this. I cannot figure out what was used between the tile and the fireplace box. I see that cove molding was used between the tile and the wood mantel. Can you help with this? Thanks you!
Hey Karen, that’s a great question and I’ll add this to the post but it’s actually an edging piece called a schluter. You can pick it up at Home Depot. It gives you that nice clean edge. https://www.homedepot.com/p/Schluter-Schiene-Aluminum-1-2-in-x-8-ft-2-1-2-in-Metal-L-Angle-Tile-Edging-Trim-A125/100209272
Thank you!
I didn’t see this in the post. Did you put it under the cement board or the tile? 3/8” doesn’t seem tall enough to cover both edges. I have a nearly identical fireplace I’m looking to tile and that’s the part that has me stumped.
Hi Courtney – you’re right – it’s actually a 1/2 edge. Here’s the link: https://rstyle.me/n/defefc27yw! And I really did add it to the post this time 😉 – We placed the schluter behind the cement board framing the fireplace. We place it behind so there would be no gap between the edge of the schluter and the fireplace. If you don’t use cement board, then you’ll just place the schluter right on the wall under the tile.
What did you use to transition the wood floor to the tile on the hearth?
We got a transitional wood piece from The Home Depot.