How to Paint Kitchen Cabinets
We’ve now painted oak cabinets about three different times so I thought I would share some time-saving tips and tricks to painting oak cabinets that will also help your newly painted cabinets last. There are hundreds of cabinet painting tutorials out there and I’m not convinced that one way is the best but I can share what’s worked for us. The first home we owned we painted our oak kitchen cabinets white, by hand, with foam rollers and it was a long slog. This go around we opted to try spraying them and it was a total time saver! If you are interested in how to paint kitchen cabinets check out these quick tips for painting cabinets without showing the grain below.
Big thanks to HomeRight for sponsoring this post! My positive opinion of their high quality, time saving equipment is totally my own. For your convenience, this post includes affiliate links. At no additional cost to you, Making Home Base may receive a small commission on anything you purchase. Check out my disclosure policy for more information.
How to Paint Kitchen Cabinets

Clean the surface of the cabinets really well
It’s really important to clean the cabinets thoroughly before you begin so that your paint can adhere properly. Our cabinets were filthy and filled with years of gunk and grime. We used a product called Murphy’s Oil to clean the cabinets with a lint free cloth.
Pick a paint with good coverage
What’s the best paint for kitchen cabinets? That’s a great question and I don’t think there’s a right answer. Since our cabinets were oak, they were light and we needed good coverage. I chose Behr Marquee because I love the formula. Since we’d used it on our walls, I knew that it had great coverage. I tried out a few colors and I ended up selecting a paint color called Still Gray by Behr and had it mixed into the Marquee line formula. A really handy tip is that you can have pretty much any color mixed into the type of paint you wish. If you know the brand along with the name of the paint, The Home Depot can color match it into the paint of your choice. Picking a good paint is a huge time saver and potentially money saver. Since our paint had great coverage, we chose not to prime the kitchen cabinets and they still only needed two coats of paint.

Don’t skip sanding
We decided to sand, fill in the wood grain, then skip priming. If you are inclined to prime and then just paint without filling the wood grain, I think you could get away with skipping the sanding step. If you know you’ll want to try to fill in the wood grain of the oak cabinetry, be sure to sand first. I know it’s tempting to pick an option that allows you to skip sanding and just paint over the cabinets but it was a crucial step to getting the paint to bond well to the cabinets. We sanded all of the kitchen cabinets really well with an electric sander, then used our shop vac to remove any dust and debris from the cabinets. The initial sand is to just get any varnish off the cabinets and get to the wood.
Fill in the wood grain
 One of the biggest questions I get asked in relation to the cabinets is if we have any grain showing. It was really important to me to get the kitchen cabinets as smooth looking as possible with little to no wood grain visible. Oak cabinets are notorious for showing wood grain even after being painting so we did take some extra steps to ensure that you would see minimal grain. We used a product called DAP Drydex spackling to fill the wood grain.
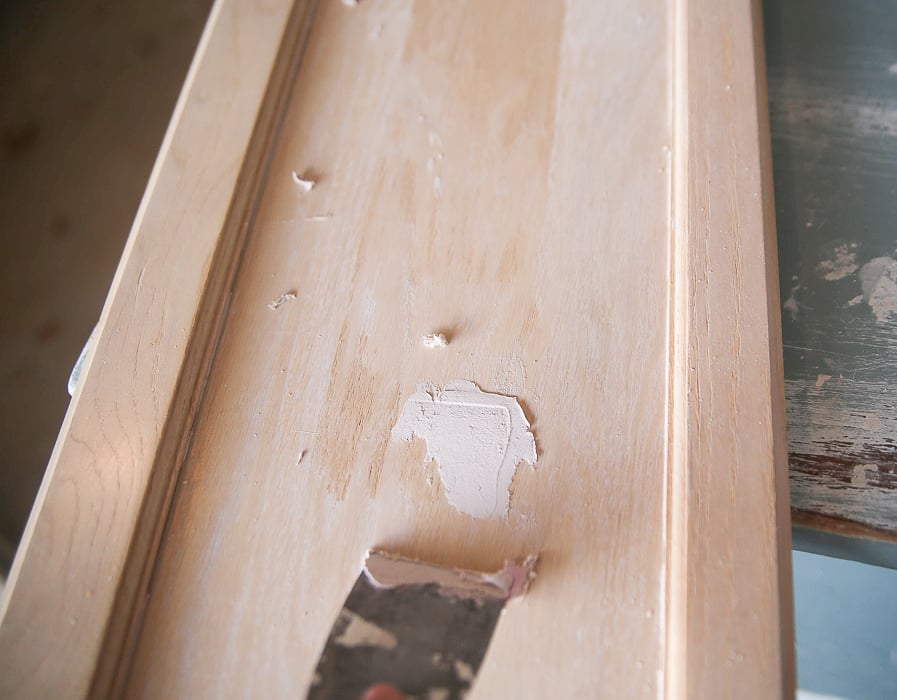 To apply it, you just take a spackling knife and run it all the way down the length of the cabinet door, filling in every little crack, then remove any excess. Then, you run the knife the width of the cabinet, again removing any excess. You allow Drydex to dry, then give it another good sand until the cabinets are smooth. After sanding – use a vacuum to pick up all the dust and debris before beginning the painting process.
Use a paint sprayer for a smooth finish
Painting kitchen cabinets can feel so daunting and I think that’s because post people imagine painting them with a brush or rollers. I’ve been there. Since we couldn’t avoid sanding the cabinets it was a relief to know that the actual painting process would be a breeze. When we painted the cabinets in our first home we painted each cabinet by hand and it took us three days with help from family. This time, we had more cabinetry and we added in the extra step of filling the wood grain so saving time by using a paint sprayer was crucial.
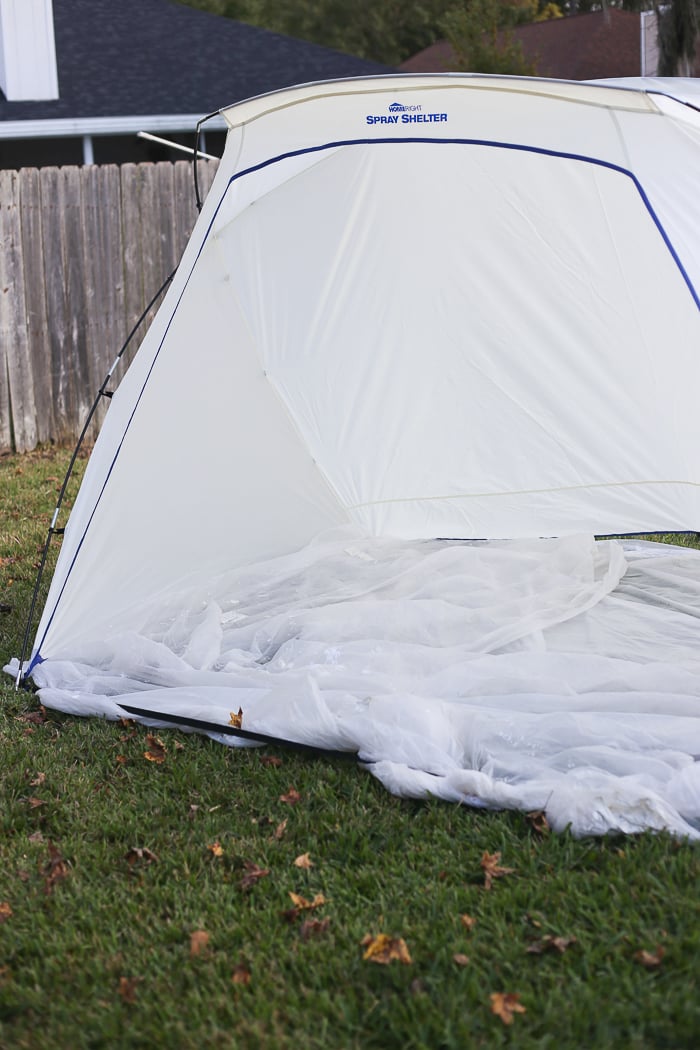 We opted to paint the cabinets using a sprayer with the HomeRight Spray Shelter so we could take the cabinet doors outside and spray them in the open air. The shelter is great for a project like this because you can spray in open air but still protect your surroundings. The best thing about painting cabinets with a sprayer is the smooth finish you get. No brushstrokes – totally smooth.
 There is a bit of a learning curve with the sprayer, we followed the directions to our HomeRight Finish Max Sprayer because you have to get the flow just right. We practiced by first painting the interior side of the cabinets and then once we were confident with the sprayer, we sprayed the outside. It took two coats of the Behr Marquee paint for full coverage – no primer.
Don’t forget a top coat
I have a little secret. We totally forgot to add a top coat on our kitchen cabinets. A top coat is important to avoid any damage to the paint. It also makes the cabinets easier to clean. When we painted our cabinets we had multiple other projects going on. It was also right around the holidays, so we wanted to just get the cabinets back up as soon as possible. A year and a half later, we just added a top coat. I will say, I was incredibly impressed with how the paint held up on it’s own. We haven’t gotten a single dent or scratch in the paint, an it’s not impossible to clean. For a top coat, we ended up applying this polycrylic. It’s one that has a true clear finish while some others tend to turn a bit yellow after time.

We have tons more kitchen content if you’re into it. You’ll definitely want to check out the best gray paint colors for kitchen cabinets.
Check out the full kitchen reveal!


Oh my goodness Chelsea, what a difference! The grey looks so perfect with those countertops and you gotta LOVE the smooth finish that only a sprayer can give! Looks fab my friend!
Thank you!! When we painted cabinets once we before we probably went through 100 foam brushes and it took us DAYS. This took us hours and the smooth finish is even better!
What?!?! How are you doing all this? You must be superwoman. The kitchen looks amazing, Chelsea! Love love love it.
I’m a crazy woman, totally different 😉 Thank you!! xoxo
Wow, it looks amazing. You guys have really been working hard and it shows. Love that large opening too, perfect.
Thanks, Marty! That opening completely changes the feel of the kitchen – we don’t feel so closed off anymore! It’s great!
I really need to look into that sprayer because painting our kitchen cabinets really overwhelms me! We’ve lived in our house for 16 months, and the kitchen (which was originally our first priority) has turned into our last due to just simply feeling overwhelmed by the time it will take. Thanks for sharing such a detailed post. Everything looks gorgeous, and I love love love that bowl sink!
I know what you mean! The sprayer makes a huge difference. It just took us a couple of hours to do the cabinets doors, then the next day we knocked out the cabinet bases. So basically a weekend project but we don’t have a huge kitchen. I definitely recommend going with really good quality paint. I love the Behr Marquee because it gets great coverage so we didn’t have to worry about priming. Huge time saver!
Absolutely gorgeous! I am loving the gray and white combo. You may have convinced me to try the sprayer on my cabinets too. You make it sound so easy and worth the work in the end!
Thanks, Sarah! I love the power of paint! It was totally worth the work and way less labor intensive than I remember it being the last time we did this (hand painted with like a 100 foam brushes).
They look amazing Chelsea!! I love the colour you chose and they look so smooth. And the quartz!!! Stunning!!
Chelsea, the cabinets look amazing! Such a huge difference. I love the color you chose – could work with so many other accent colors. The whole transformation is just awesome! Way to kill it, girl!
What a difference those cabinets made! I love the color you choose, too.
I love your kitchen! You did a great job, Chelsea. I need that spray painter.
Hugs, Jamie
The before photo looks eerily similar to my parents’ house in Miami. From the paint color, or cabinets, to appliances, to crappy galley style. Absolutely love the after photos!
Speckling the kitchen cabinets before painting is an interesting idea. I’ve never thought to do that before. It probably helps keep the paint all smooth so there is no gaps or bubbles.
Hi Sarah, we added spackling avoid seeing the wood grain after the cabinets were painted. It leaves a really smooth finish.
so how did you finish the outer parts of the cabinets…did you sand them all?
Hey Mary,
Yes – we used an electric sander and gave them all a quick sand just to roughen them up. We used a shopvac to vacuum up all of the dust. Then, we cleaned them really well and painted them up with a brush. You certainly could spray them but it would require you to tape off quite a bit.
How far into the cabinet bases did you paint?? All the way inside or just the frames? Looks amazing!
Hi Anna – do you mean did we paint the inside? No, we didn’t. We painted the outside of the cabinets and then just the lip of the cabinet that way when they are open you didn’t notice a color difference. Does that make sense? The cabinets on the inside were a raw wood anyway.
how many hours and days did this take?
also,
You didn’t use the sprayer on the cabinet frame since no way to really protect surrounding surfaces, so how did you paint?
Matte finish or satin, gloss, etc?
How are the cabinets holding up? I am surprised you used murphys oil soap and did not prime them first or use some type of cabinet paint. Seems like latex paint would not adhere very well in the long haul. They look nice though.
P
Hey P, they actually have held up incredibly well – almost two years later they have absolutely zero flaws. 🙂
Your polycrilic link doesn’t take me to the product? Could you relink or offer the product name? About to begin our project with Marquee paint this Thursday! Your wisdom is helping me finally jump into this long-awaited project!!!
I also couldn’t get the polycrylic information. Please advise. Thanks. Your kitchen looks great!
Hi Marychris, I recently updated this post and included the polyclic info – we used polyclric but didn’t apply until later because we had totally forgot. I link the stuff we used in this post under the “top coat” section.
Awesome job. One question, did you have to thin the paint?
We did not thin the paint.
I’m wondering if you sanded before the spakle (after cleaning) AND after the spakle…..or was it just after the spakle??
Also, I think someone else asked this question but I did t see a response. What type of the Marque paint did you use? Satin? Semi gloss??
Thanks
Lots of sanding! We sanded before spackle to remove the gloss on the cabinets, then spackled, then sanded again then painted! Great question on finish of the paint. It was semi gloss.
Looking for the name of the top coat. The link is not working. Thanks!
Hi Angie – it’s a Minwax product – try this affiliate link: http://rstyle.me/n/ctrdqs27yw
What grit of sandpaper did you use before and after the spackling?
Hi! It’s been a few years now. Did the Polycrylic yellow the white paint at all? How has it held up? Thanks!
We painted the cabs gray so no, there was no yellowing or any discoloration at all.
Thank you for stepping through the details. I am going to attempt painting cabinets next weekend. In looking at the top coat, would you recommend brushing it on, spraying it on with a spray gun or spraying it on with their aerosol can?
We brushed the top coat on with foam brushes but I think I’d be interested in trying the spray can.
Could you spackle after putting a coat of primer on already? I just found this tip after begining my cabinet project and quickly realizing the grain still showing through. I’d really like to avoid stripping.
Hi Haylie, sure can!
Thank you! I am going to try this
I did the same thing as above! Two coats of primer and there are a few areas that are really bad. If I spackled after the primer, would I need anorith coat of primer or could I jump to top coat?