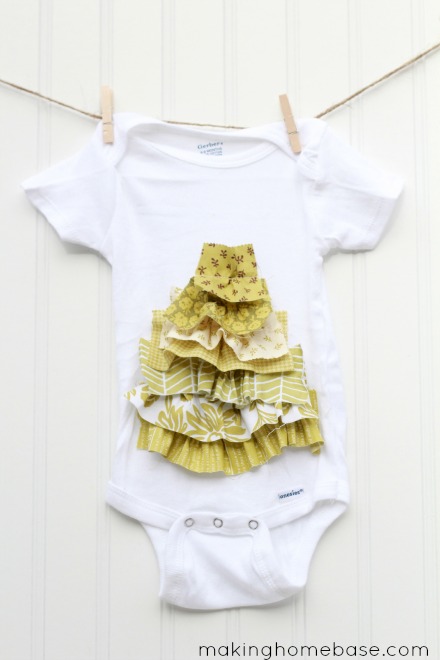
Ruffle Christmas Tree Onesie Tutorial
So I’m kind of addicted to onesies. My little baby wears onesies and leggings all.the.time. Yeah, we love dresses too but there is nothing cuter than her little round belly in a onesie! And the best part? Making them! You are going to love this onesie tutorial!

Remember my Pumpkin Applique Onesie from a few weeks back? Well here is round two of holiday baby onesies, A Ruffle Christmas Tree Onesie Tutorial.

For this project you’ll need to grab a few fabric scraps and trim them to 2 in. wide. I used seven strips. Varied lengths is fine, you’ll trimmed them down to size once they are ruffled.

Once you’ve cut your scraps to 2 in. wide strips. You’re ready to start ruffling. If you have a ruffle foot for your machine, great! If not, you can do what I do, turn your tension up as high as it goes. For me, that’s 9. And bump your stitch length up as high as it goes. For me, that’s 5.0. Once you’ve got your settings ready, sew a straight line down the middle of your strips.

Your strips should look like this. Oh, that brown fabric? I played with the idea of doing a brown trunk for my tree but ended up leaving it out.

With your onesie laying flat, start placing your ruffled strips in the ordered you’d like and trim them to make the shape of your tree. Once you’ve figured out the placement. Pin the strips in place, with each strip slightly overlapping the one beneath it. Making sure you’ve returned your settings to normal, sew each strip into place, backstitching at the beginning and end to secure your stitch. I can’t stress enough how important back stitching will be for this onesie. My six month old loved pulling on the ruffles. Had I not back stitched I’m sure she would have pulled some of them right off.

Once you’ve got all your strips sewn into place, you can go through and take out the basting stitch, or the ruffle stitch.

You’re all done! See, now wasn’t that an easy DIY onesie. Wouldn’t this be a fabulous gift?

And because I LOVE showing her off, here is my sweet little babe modeling her new Christmas onesie!
Let me know if you use this tutorial to make one for yourself. I’d love to see it! And be sure to check out my other baby tutorials here.


That is adorable beyond adorable!! My little one won’t be here until March but I would definitely make this next Christmas!
http://www.divagoesorganic.com
This is so adorable, Chelsea! I love the sweet ruffles, and it doesn’t look overly-complicated at all. Your baby is so beautiful, by the way! 🙂 Thanks for sharing this with us!
So adorable and lovely, and what a princess you have! Beautiful, have a happy day
So cute!
Very cute! Will have to remember this for the next time there’s a little girl at Christmas time!
Hey there! I’m loving your blog! I wanted to let you know that I nominated you for the Liebster Blog Award. You can read more about it here: http:/www.givethatgirlacola.com. Happy Holidays!
So cute! Makes me want a little girl! Don’t think my baby boy would look as cute! Cam over from the Happy Hour Linky party!
THis is sooo cute! I love onsies for their “blank canvas” quality! So many awesome ideas out there!
I love all the little onsies you make for Miss P! She is too cute and what girl doesn’t look good in ruffles 🙂
Thanks so much Taryn! Little girls are just too much fun!
Cute!
Love the idea of ruffled strips rather than just straight ones! Going to make two of these.
oh this is too cute! and your little girl is ADORABLE!!
Thanks for linking up! I featured your post in my wrap up http://tidymom.net/2012/christmas-holiday-ideas/
Happy Holidays!
This is a very cute idea! Thanks for sharing.
Donna @onceuponasewingmachine.com
Chelsea, this onesie is adorable! Your little one is so cute as well.
This is SO dang cute!!
I’m wondering.. Can you use ribbon, too? Instead of fabric? Will it hold up in the wash?
Chelsea, this is absolutely adorable! I love it and so wish I had a little girl to put it on! Your baby girl is a cutie! Great job!
Super cute thanks for sharing!!
Oh my gosh, that is too cute! I just love it! Thanks for sharing at The Fun In Functional!
too cute!!! i love the fun ruffles!
Cute onesie and adorable baby!
T’onna
Submarine Sunday Link Party
Super cute! I am going to make this for my new granddaughter! Thanks so much!
Jenna
Hi, Chelsea
I love this! Wish I had a little one. I found your lovely blog from Not just housewife link party and I enjoyed looking around your lovely blog. I am a new follower. Love for you to stop by http://www.homesweetbutterfly.com. Have a great day!
Vanessa
oh my gosh, this is adorable!
That is definitely cute…… but since Christmas is in the winter, wouldn’t it make more sense to put this tree onto a long-sleeved t-shirt, instead of an undergarment?
So cute! Please share your projects at http://www.creativecraftsthursday.blogspot.com each and every week and check out what other creative divas are up to.